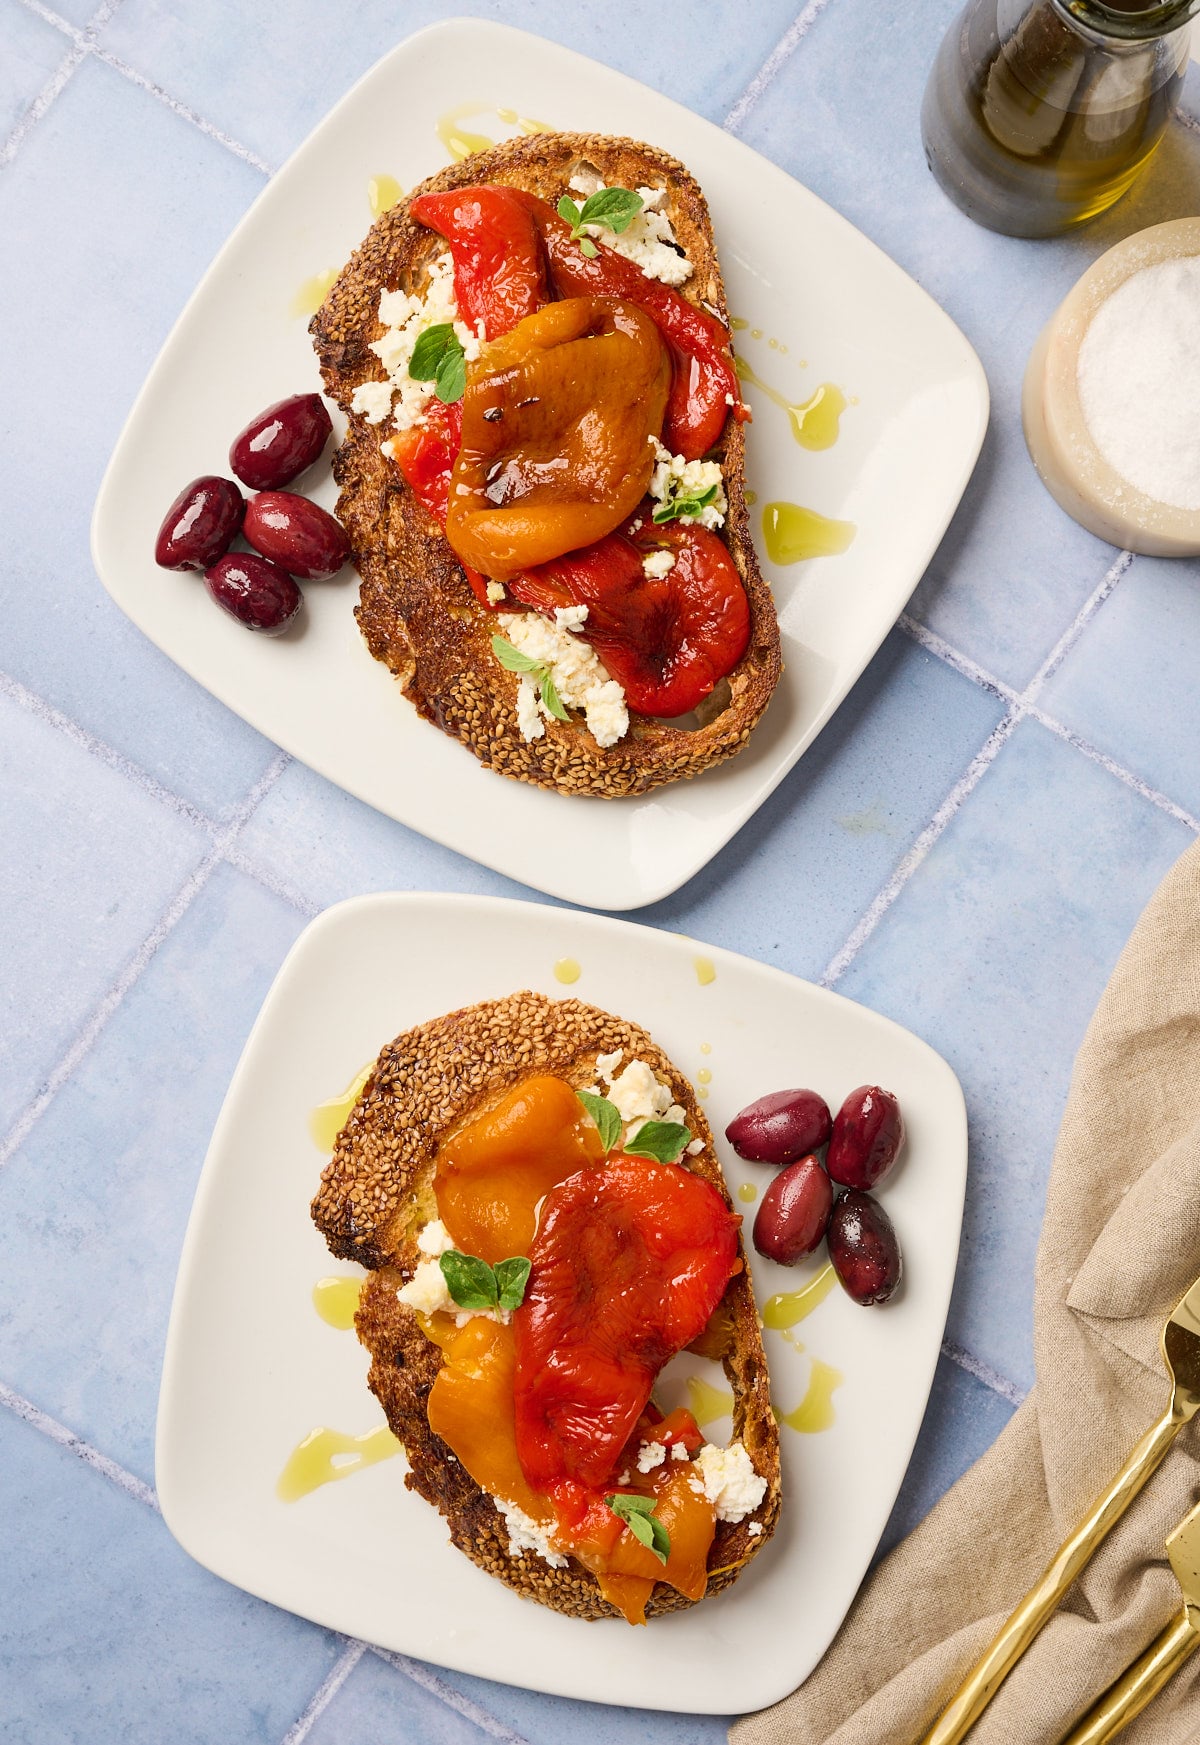
Naturally sweet, silky, and full of flavor, these roasted peppers come together using my chef-tested oven or flame method. Peel them by hand and marinate them in their “pepper lacquer” for a luxurious, ready-to-use staple all week long.
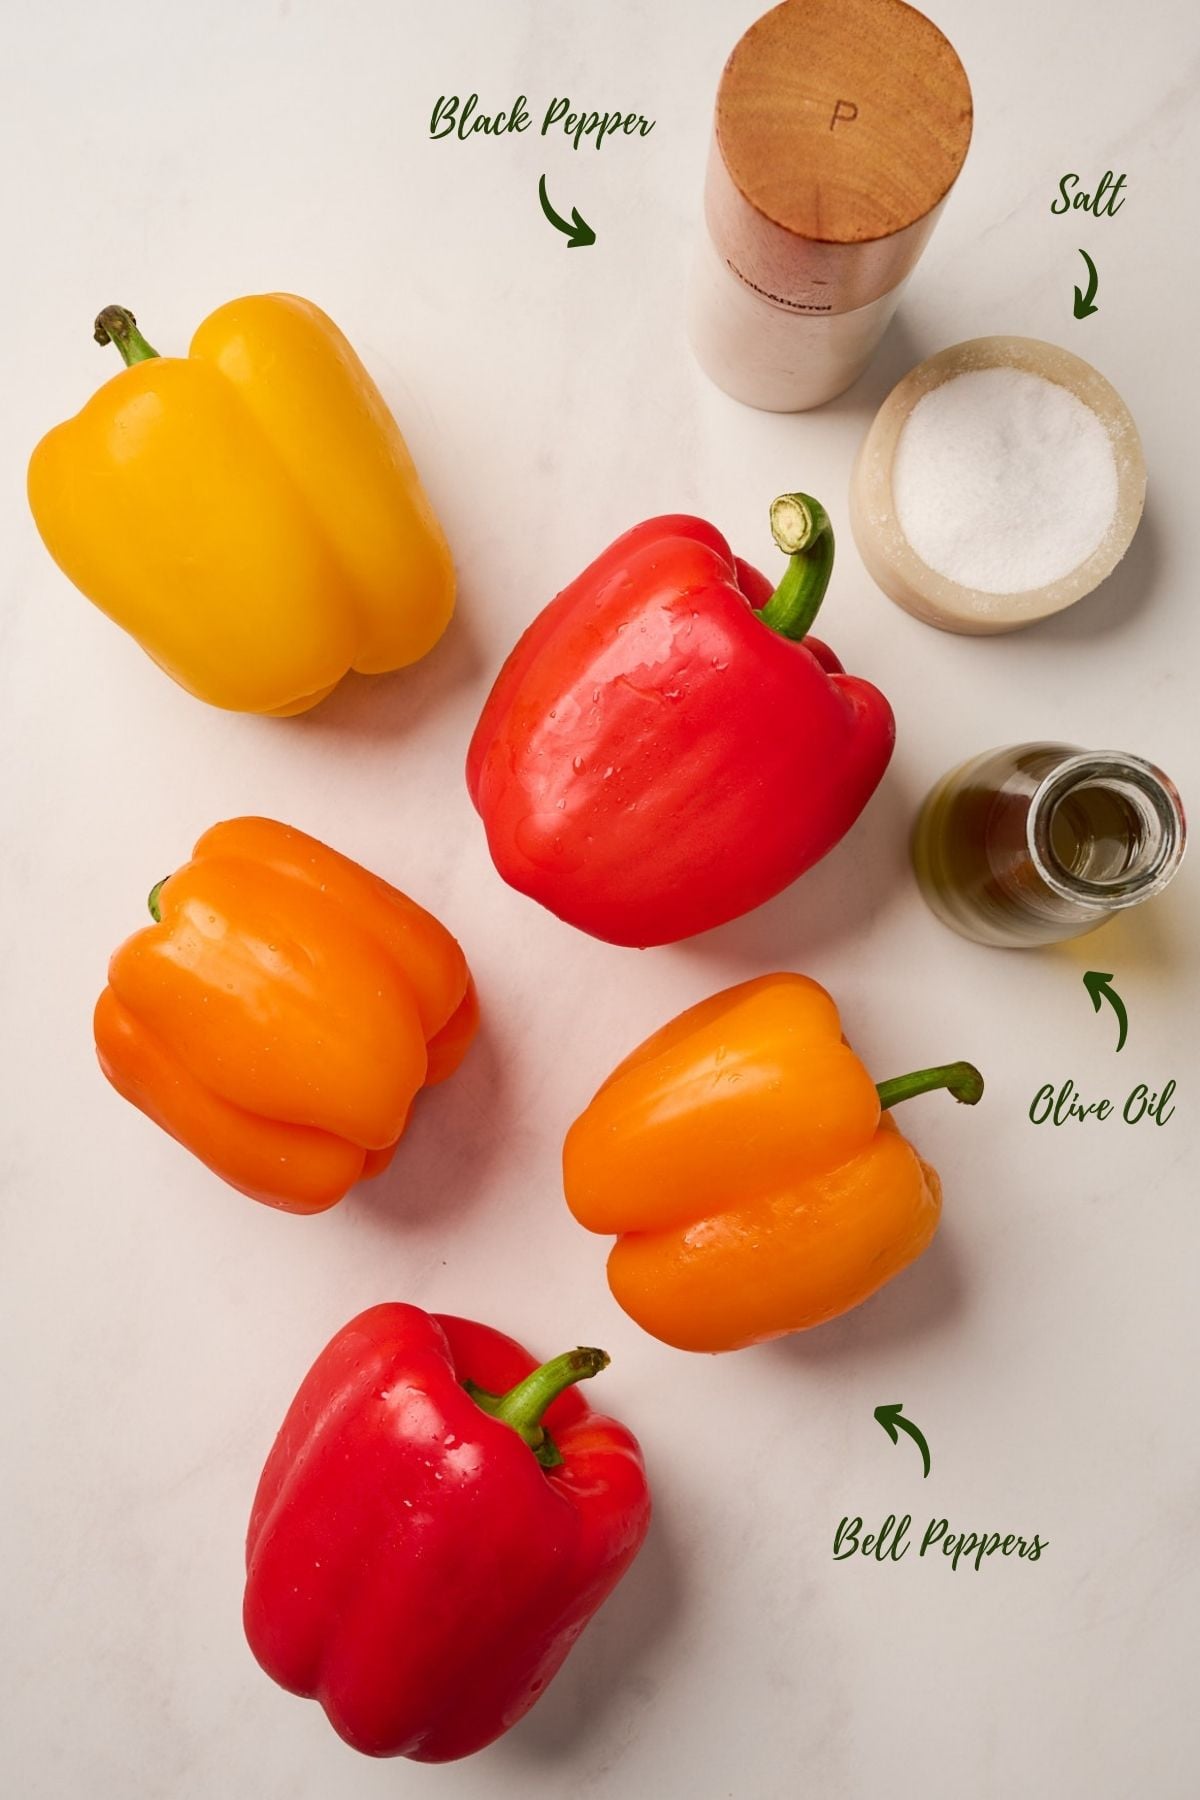
As a professionally trained chef with years of experience roasting peppers in restaurant kitchens and on culinary TV shows, I’ve refined both techniques to bring out the peppers’ natural sweetness and silky texture. The recipe uses just three ingredients: fresh bell peppers, extra virgin olive oil, and kosher salt.
The secret to this recipe is what I call the pepper lacquer—the naturally sweet liquid released as the peppers steam after roasting. My executive chef at Lupa called it “liquid gold,” and for good reason: it becomes a deeply flavorful base for marinating and storing the peppers.In this post, I’ll walk you through both roasting methods and show you how to turn the finished peppers into kitchen staples you can use all week—from blending into tirokafteri or homemade hummus to folding into healthy bulgur wheat bowls and so much more.
Ingredient Notes for Roasted Peppers
This recipe starts with a few essential ingredients, and from there, you can take as many creative liberties as you like.
Bell Peppers
For the sweetest, most flavorful roasted peppers, choose red, orange, or yellow bell peppers. Their higher natural sugar content caramelizes beautifully. Green peppers can be roasted too, but they’re less ripe and often have a slightly bitter flavor.
What Types of Peppers Can Be Roasted?
These methods work with a wide range of peppers beyond standard bell peppers. Sweet options include pimento and Italian frying peppers. For smoky or spicy results, try poblanos, Pasilla peppers, Hatch chiles, jalapeños, serranos, or Anaheim peppers. Choose based on the heat level and flavor you want.
Olive Oil (Plus Substitution Options)
Extra virgin olive oil is added after roasting, combined with the pepper lacquer to form a silky, flavorful marinade that helps preserve the peppers.
• For a neutral flavor: avocado or grapeseed oil
• For a richer, aromatic finish: hazelnut or walnut oil
All of these pair beautifully with roasted peppers.
Kosher Salt
Lightly season the peeled peppers once they’re stored in the lacquer and oil. Kosher salt sharpens their natural sweetness and makes the marinade taste brighter.
What Is Pepper Lacquer?
Pepper lacquer is the naturally sweet, concentrated liquid released as the peppers steam after roasting. As the skins loosen, this juice collects at the bottom of the bowl. My executive chef at Lupa called it liquid gold and insisted we save every drop because it carries the deepest roasted flavor and natural sweetness.
How to Use Pepper Lacquer
Pour the lacquer into your storage jar along with the peeled peppers and olive oil. It becomes the base of the marinade and intensifies the peppers’ flavor as they rest. You can also drizzle it into dips, whisk it into dressings, or add a spoonful to soups, sauces, or grain bowls for an extra layer of savory, roasted richness.
Key Techniques for Perfect Roasted Peppers
Having roasted countless peppers in restaurant kitchens and on culinary TV sets, I’ve learned that a few non-negotiable techniques separate good roasted peppers from truly unforgettable ones. Mastering these steps is the key to achieving that silky texture and deep, sweet flavor.
Roast Peppers Whole (and Why Not to Slice Them First)
Roast peppers whole for the best texture and flavor. Keeping them intact traps steam inside, which softens the flesh gently, loosens the skins for easy peeling, and prevents dryness. Sliced peppers lose moisture quickly and can become stringy or mushy, while whole peppers turn silky and tender every time.
Trap the Steam Immediately
Once the peppers are charred, transfer them to a bowl or paper bag and cover tightly. The trapped steam loosens the skins and creates the flavorful pepper lacquer that settles at the bottom.
Never Rinse After Peeling
My executive chef at Lupa drilled this into my brain: never rinse a roasted pepper. Rinsing washes away both the smoky or roasted flavor and the precious lacquer. Peel the skin by hand and gently scrape away the seeds and membrane with the back of a knife.
Finish with Olive Oil
Store the peeled peppers in their pepper lacquer with a generous drizzle of olive oil. This enhances their natural sweetness, creates a glossy finish, and helps preserve them in the refrigerator for up to two weeks.
Troubleshooting Roasted Peppers (Common Problems + Fixes)
Even with a simple recipe, small adjustments can make a big difference. Here are the most common issues and how to fix them.
Problem: The peppers are watery
Fix: Roast or char the peppers longer until the skins are fully blistered and blackened. Under-roasting traps excess water; a deeper char concentrates flavor and prevents sogginess.
Problem: The skins are difficult to peel
Fix: Steam the peppers longer. Keep them covered in a bowl or paper bag for at least 20 minutes. If the skins still resist, steam for an additional 5–10 minutes.
Problem: The peppers taste bland
Fix: Make sure you saved the pepper lacquer. Add it to the storage jar with olive oil and a pinch of kosher salt. The lacquer adds concentrated sweetness and roasted flavor.
Problem: The peppers turned mushy
Fix: This usually happens when peppers are roasted sliced instead of whole. Roasting them whole traps steam and softens the flesh gently without collapsing.
Problem: The peppers lack smoky flavor
Fix: Use the open-flame method and char all sides thoroughly. A deeper blister equals a deeper smoky flavor. You can also add a touch of smoked paprika to the marinade.
Problem: The peppers are too spicy (when using hot varieties)
Fix: Remove the seeds and inner membranes completely. Most of the heat lives there. Mixing spicy peppers with sweet bell peppers can also balance the flavor.
Frequently Asked Questions (FAQ)
As a culinary instructor, I’m often asked the same questions about getting perfect roasted peppers. Here are the most common ones, answered clearly and simply.
Do I have to peel the peppers?
Yes. Peeling is essential for the silky, tender texture this recipe is known for. The roasting process chars the skin, which can become bitter, so removing it ensures the best flavor and consistency.
Can I use green bell peppers?
You can, but I recommend red, orange, or yellow peppers for their natural sweetness and caramelization. Green peppers are less ripe and can taste slightly bitter once roasted.
Can I freeze roasted peppers?
Absolutely. Roasted peppers freeze well for up to 2 months (without oil). Freeze them in a single layer on a baking sheet first to prevent clumping, then transfer to a freezer-safe bag. More details are in the “How to Store” section.
What’s the best way to char peppers without a gas stove?
The oven method is your best alternative. Roasting whole peppers at 425°F creates a deep, even blister and yields the softest, most delicate texture.
Can roasted peppers be canned safely?
Roasted peppers should not be canned at home unless following a USDA-tested pressure-canning recipe. Peppers are naturally low in acidity, and roasting reduces their acidity even further. Store them in the refrigerator for up to two weeks or freeze for longer storage.
Why does olive oil solidify in the fridge, and how do I fix it?
Olive oil naturally becomes cloudy or firm when chilled. This is normal. Simply let the jar sit at room temperature for 10–15 minutes and it will return to a fluid state.
Can I add other ingredients like garlic or herbs to the storage jar?
You can safely add dried herbs, spices, and citrus zest to the storage jar. Fresh herbs like basil, parsley, oregano, or cilantro are also safe to add and will infuse the oil beautifully.
For fresh garlic, however, use caution. Garlic stored in oil for extended periods can pose a food safety risk. If you want that fresh garlic flavor, add it right before serving rather than storing it in the jar.
Do roasted peppers lose nutrients like vitamin C when cooked?
Roasting does reduce some vitamin C because it’s heat-sensitive, but roasted peppers remain rich in antioxidants, natural sugars, fiber, and beneficial plant compounds. They’re still highly nutritious and offer plenty of health benefits.
How to Roast Peppers: Step-by-Step (2 Methods)
I use two professional techniques for roasting peppers: oven-roasting for the softest, silkiest texture, and open-flame charring for a bold, smoky flavor. Both methods blister the skins so they peel easily and develop a naturally sweet, concentrated taste.
Oven Method (For a Silky Texture)
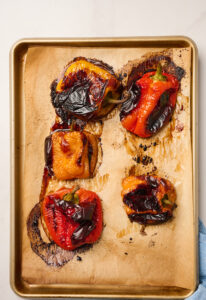
Preheat the oven to 425°F and roast the peppers whole on a parchment-lined baking sheet. The high heat blisters the skin while the steam inside softens the flesh for a tender, silky result.
Open Flame Method (For a Smoky Flavor)
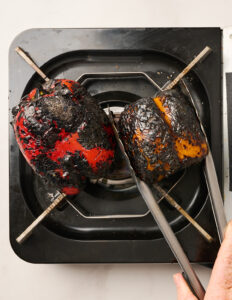
Char the peppers directly over a gas burner or hot grill, turning with tongs until all sides are blackened. This creates a deeper, smokier flavor in less time. Use your exhaust fan, as this method can get smoky.
Broiler or Grill Alternative
You can also roast peppers under the broiler or on a hot grill. Both methods create a similar char, but monitor closely—direct heat can blister the peppers quickly.
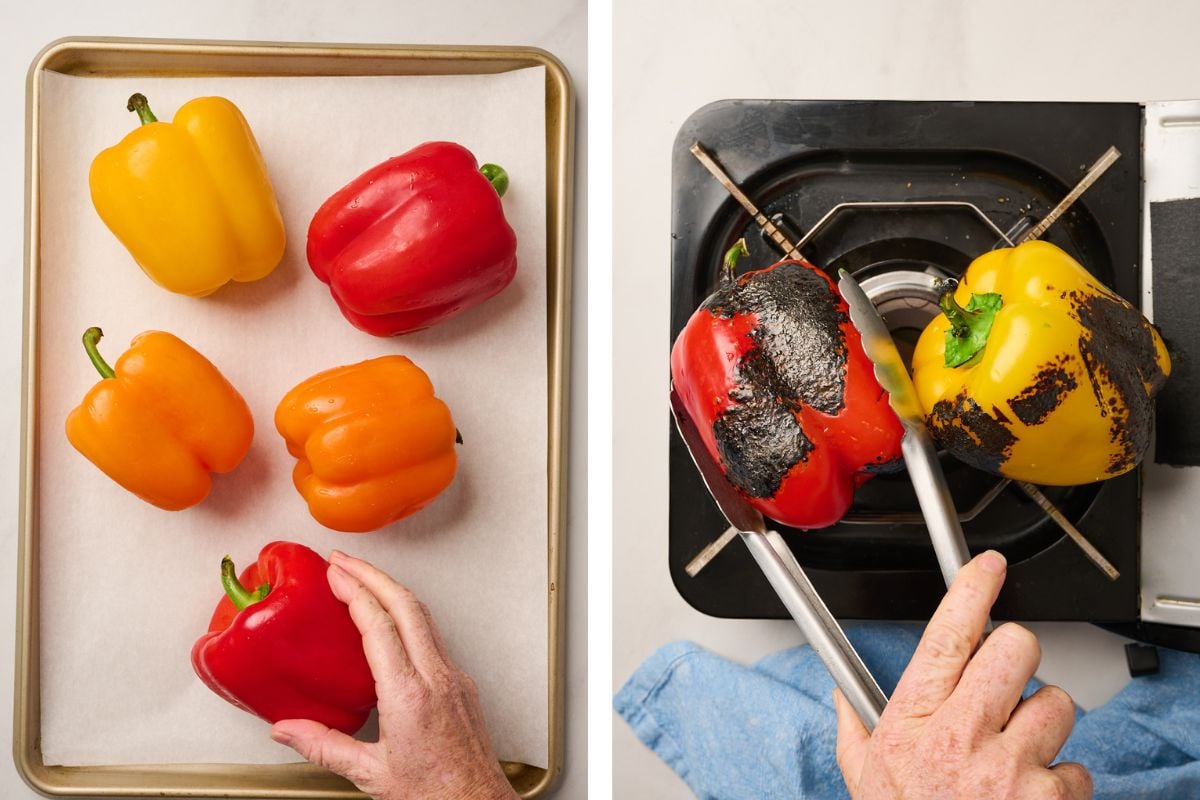
Step 1: Roast or Char
- Oven: Roast for 30–35 minutes, turning every 10–15 minutes until the skins are deeply blistered.
- Open Flame: Char for 12–15 minutes, rotating until all sides are blackened.
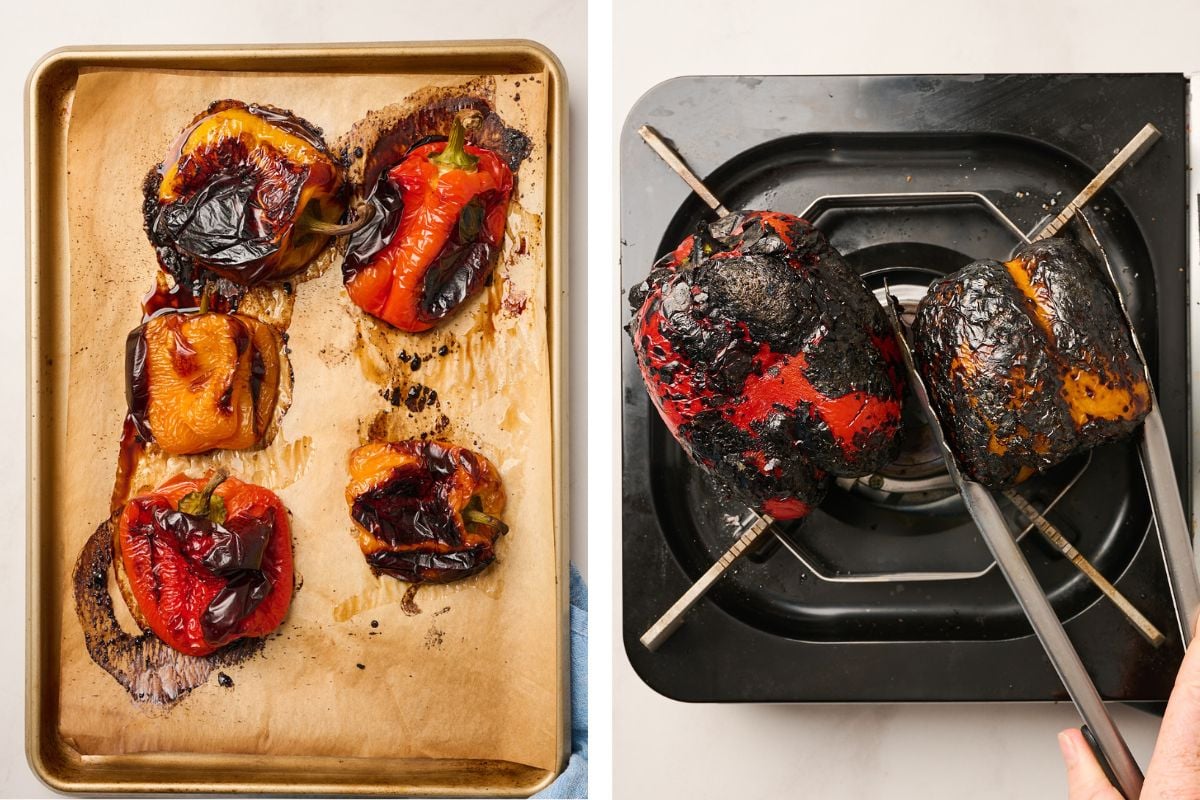
Step 2: Sweat for Easy Peeling
Immediately transfer the hot peppers to a covered bowl or sealed paper bag and let them steam for at least 20 minutes. This loosens the skins and creates the flavorful pepper juices in the bottom of the bowl.
Troubleshooting: If the skins don’t peel easily, steam for a few minutes longer.

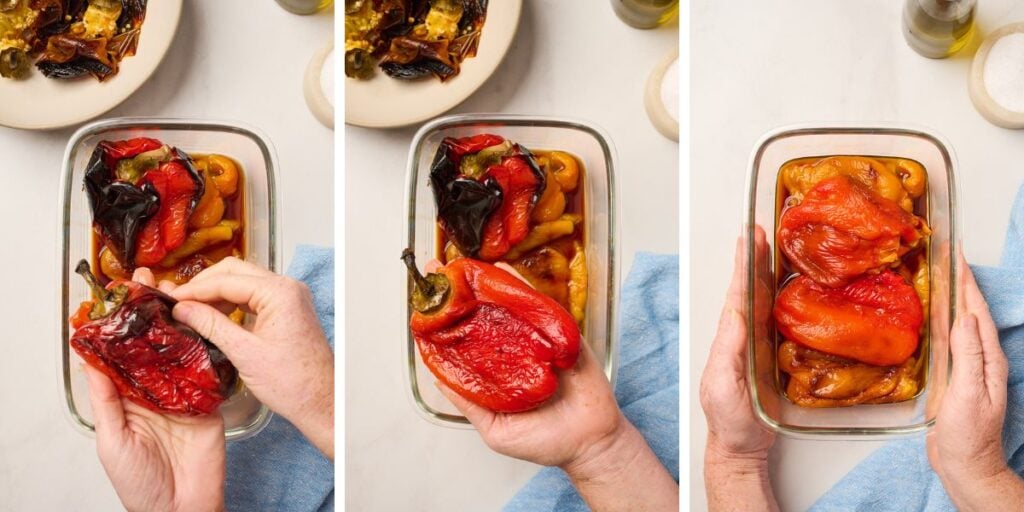
Step 3: Peel and Store
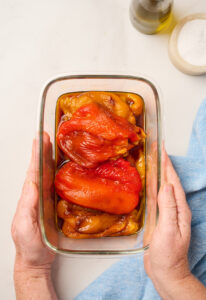
Peel and Seed: Once cool enough to handle, peel off the skins by hand. Never rinse—the water washes away flavor and pepper lacquer. Remove the stems, cores, and seeds.
Save and Store: Place the cleaned peppers in a jar with the pepper lacquer and a generous drizzle of olive oil. Season lightly with kosher salt and store in the refrigerator for up to two weeks.

Easy Roasted Peppers Recipe (With Oven + Flame Methods)
Ingredients
- 5 red, orange, or yellow bell peppers (whole)
- 1/4 cup extra virgin olive oil
- Kosher salt and freshly ground black pepper, to taste
Instructions
Step 1: Roast the Peppers (Choose One Method)
- No need to oil the peppers—the skins blister better when roasted dry.

- Oven (Silky Texture): Preheat oven to 425°F. Place whole peppers on a parchment-lined baking sheet. Roast 30–35 minutes, turning every 10–15 minutes, until the skins are evenly blistered and charred.
- Open Flame (Smoky Flavor): Char peppers directly over a gas burner or hot grill, turning with tongs until all sides are blackened, about 12–15 minutes.

Step 2: Steam and Peel
- Transfer the hot peppers to a large bowl and cover tightly (or seal in a paper bag). Steam 20 minutes to loosen the skins.

- Once cool, peel by hand—do not rinse—then remove stems, cores, and seeds. Save the flavorful liquid in the bowl (“pepper lacquer”) for storing.


Step 3: Store the Peppers
- Place the peeled peppers and pepper lacquer in a jar or airtight container. Add olive oil and season with salt and pepper. Refrigerate up to 2 weeks.
Notes
- Best Peppers: Red, orange, and yellow peppers roast into the sweetest, silkiest results. Green peppers work but taste more bitter.
- Chef Tip: Save the Lacquer: This naturally sweet roasted juice is your built-in marinade. Never discard it.
- Chef Tip: Oven vs. Flame: Oven = softest and silkiest. Open flame = bold, smoky flavor and a firmer bite.
- Variations:
• Mediterranean: vinegar, basil, oregano, parsley, lemon zest, capers, olives.
• Smoky: cumin, coriander, smoked paprika, chipotle powder, hot sauce.
• Mexican: lime zest/juice, chipotle in adobo, jalapeño, cilantro, Tajín. - Storage: Keep refrigerated for up to 2 weeks in olive oil + lacquer. For freezing, store peeled peppers without oil in a freezer bag for up to 2 months.
- Serving Ideas: Great in salads, sandwiches, pasta, grain bowls, dips, or on breakfast toast.
- Batch Tip: Ideal for meal prep. Make a large batch and use throughout the week.
Nutrition

Dietary Information
These roasted peppers are naturally vegan, gluten-free, dairy-free, Whole30-friendly, and paleo. With no added sugars or additives, they fit seamlessly into many dietary lifestyles. You can customize the marinade with dried herbs, spices, or citrus to suit your preferences.
Flavor Variations for Roasted Peppers
Once your roasted peppers are peeled and stored in their pepper lacquer and olive oil, you can create countless flavor profiles. Here are a few of my favorite combinations.
Note: Add fresh garlic only when serving. For storing, use dried garlic or garlic powder.
- Mediterranean: Add balsamic or red wine vinegar, basil, oregano, parsley, lemon zest, capers, olives, and red pepper flakes for a bright, herb-forward flavor.
- Smoky: Stir in cumin, coriander, smoked paprika, chipotle powder, cayenne, or a splash of hot sauce for a deeper, bolder finish.
- Mexican: Add lime zest or juice, chipotle in adobo, jalapeño, cilantro, or Tajín for fresh, vibrant heat.
- Italian: Mix in Calabrian chili, a splash of red wine vinegar, and fresh basil for a classic Italian-style marinade.
- Simple Herb: Add thyme, rosemary, or marjoram with a touch of vinegar for a clean, aromatic finish.
How to Store Roasted Peppers (Refrigerator and Freezer Instructions)
Proper storage helps preserve the peppers’ silky texture and sweet, roasted flavor. These two methods cover both short- and long-term options.
How Long Roasted Peppers Last in the Refrigerator
Store roasted peppers in an airtight container, fully submerged in their pepper lacquer and olive oil. They will keep for up to 2 weeks, and the marinade continues to deepen their flavor as they rest.
How Long Roasted Peppers Last in the Freezer
Always peel the peppers before freezing—skins become tough and difficult to remove after thawing. Freeze the peppers without oil in a freezer-safe bag for up to 2 months. Their texture softens after thawing, making them ideal for soups, dips, sauces, and blended recipes.
How to Use Roasted Peppers (Breakfast, Bowls, Dips, and More)
Roasted peppers are a true kitchen workhorse. Their sweet, silky texture pairs effortlessly with dips, breakfasts, mains, and vegetable sides. Here are my favorite ways to use them:
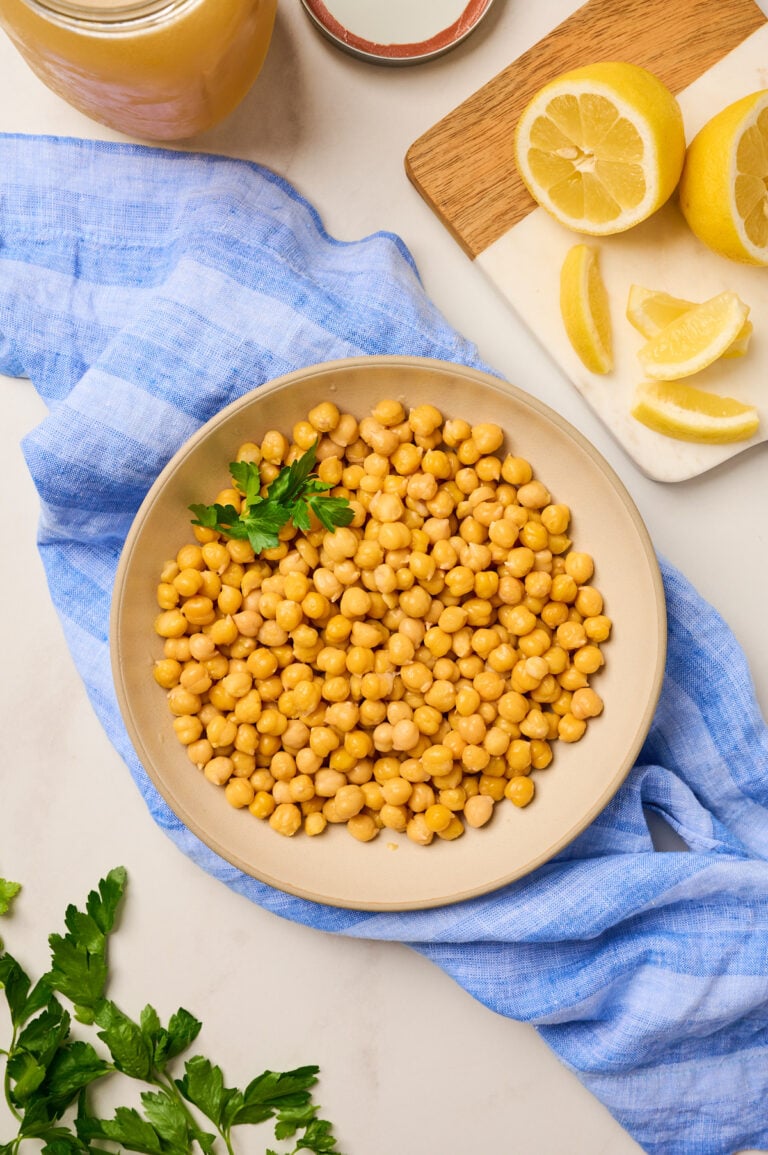
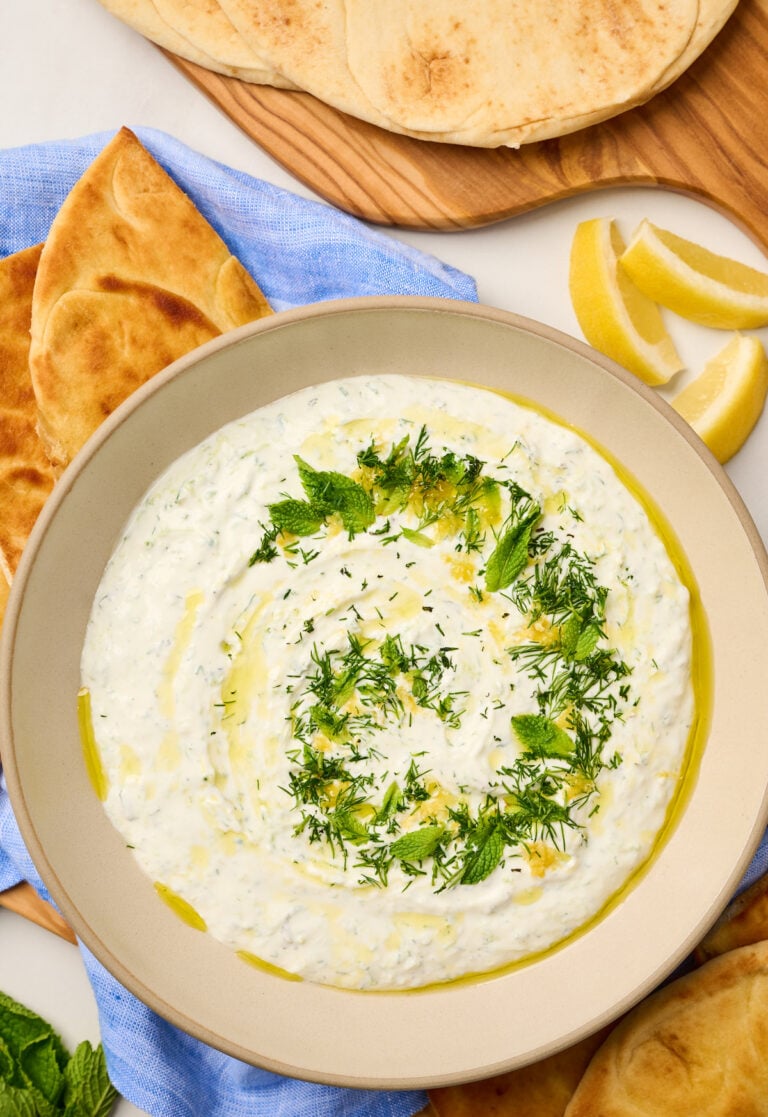
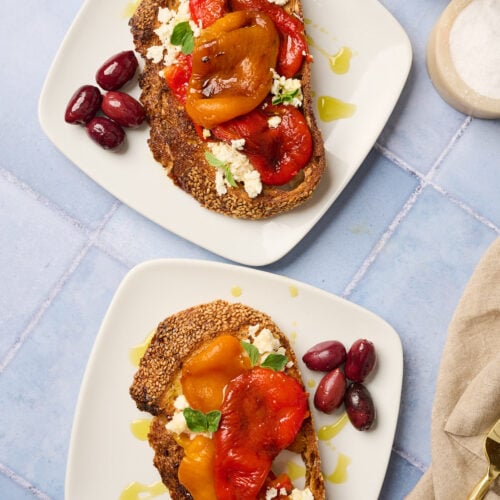
- Blend into dips and spreads: Add depth and color to dips like my spicy feta tirokafteri or creamy homemade hummus. They’re also excellent on an appetizer board with cheese, olives, and crusty bread.
- Elevate your breakfast: Fold into omelets and frittatas, or layer on toast with ricotta, garlic kale, and a soft-boiled egg for a savory, vegetable-forward start to the day.
- Enhance main courses: Stir chopped peppers into grain bowls with farro or healthy bulgur wheat, spoon onto homemade pizza, or blend into a rich roasted red pepper soup.
- Brighten vegetable sides: Add roasted peppers near the end of cooking to sheet-pan roasted vegetables like zucchini, onions, or cauliflower. Their natural sweetness adds flavor, moisture, and balance.
More Favorite Vegetable Sides
If you’re looking for more delicious ways to enjoy vegetables, here are some of my favorite chef-tested sides that highlight seasonal produce and bold flavor:
- Add rich, jammy sweetness to your table with my Tomato Confit, perfect for spreading on toast or spooning over grilled fish.
- Bring vibrant color and natural sweetness to your plate with these simple Roasted Beets, delicious in salads or served on their own.
- Enjoy deep umami with my savory Miso Eggplant, a flavorful side that pairs beautifully with warm rice.
- Try this quick and healthy Baby Bok Choy, a tender-crisp vegetable that cooks in under ten minutes.
- Keep things simple and nutrient-packed with my easy Sautéed Kale, great with eggs or served as a base for a grain bowl.