
This chef-guided salmon sashimi recipe creates a stunning, restaurant-quality dish- ready in under 10 minutes. Follow my simple, professional techniques to prepare this raw, buttery, and melt-in-your-mouth appetizer. This sashimi is decadent and delicious simplicity, without the high-end restaurant price tag.
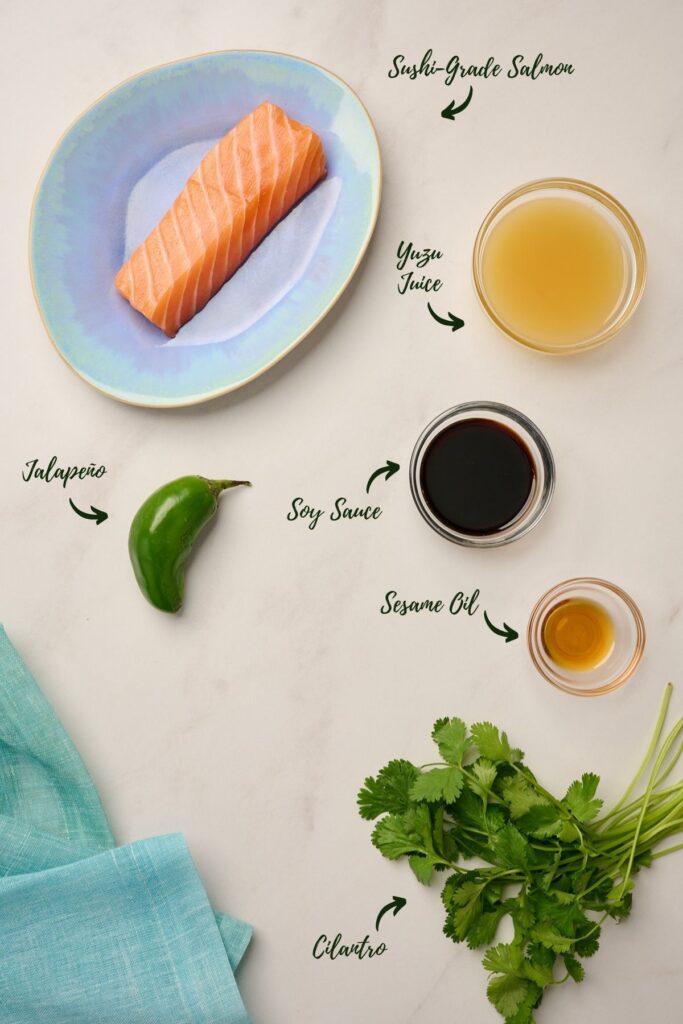
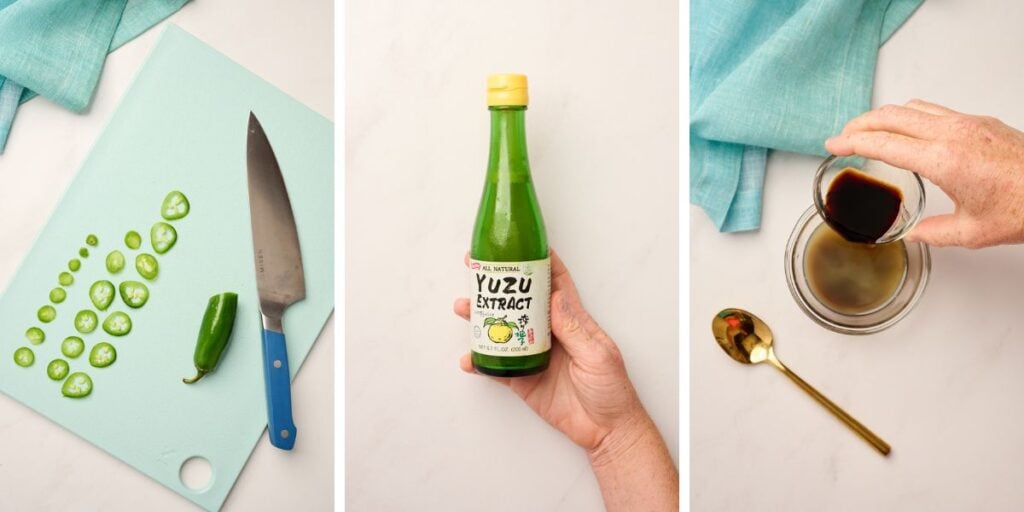
This recipe comes together with just a few high-quality ingredients. You’ll need sashimi-grade salmon, yuzu juice, soy sauce, thinly sliced jalapeño, herbaceous cilantro, and a touch of toasted sesame oil.
When training at ICE, I learned the critical lesson of respecting the integrity of ingredients—an essential when preparing sashimi. This guide is built on that core culinary philosophy: it all starts with selecting the best possible fish.
I absolutely love Chef Nobu Matsuhisa’s iconic Yellowtail Sashimi with Jalapeño, and this recipe is an homage to this dish. My version features buttery salmon with a more heat-spiked ponzu sauce. In this guide, I’ll teach you two slicing techniques—Hira-zukuri method for thicker flat cuts, and Sogigiri for angled, thinner pieces. Correct slicing will ensure every single bite has the perfect texture you’d expect from a high-end sushi bar.
What is Salmon Sashimi?
Salmon sashimi is a traditional Japanese dish of sliced raw salmon served chilled, often with an accompanying sauce and garnishes. People often confuse sushi and sashimi: sushi has vinegared rice, while sashimi is just the fish. The entire philosophy of sashimi focuses on pristine fish and precise cuts to enhance flavor and texture. Therefore, learning how to select premium salmon is the most critical first step to mastering this dish at home.
The Secret to Incredible Sashimi: Sourcing the Right Fish
As a professional chef, I can’t stress this enough: you cannot use just any piece of salmon for sashimi. For fish to be safely eaten raw, it must undergo a rigorous evaluation process designed to reduce the risk of bacteria, parasites, and microorganisms that can cause food poisoning and food-borne illness when eaten raw.
This is why you must only use fish that is explicitly labeled “sashimi-grade” or “sushi-grade.” This label is a professional stamp of approval, signifying the salmon has passed a series of exceptionally high-quality assessments from the sea to the supplier. This in-depth process ensures the fish is worthy of raw consumption and typically includes:
- Proper Handling: The fish is managed with specific, food-safe techniques from the moment it’s caught.
- A Safety Kill-Step: This often involves commercial flash-freezing to eliminate parasites, a method significantly more effective and controlled than home freezing.
- Expert Assessment: The fish is physically inspected by professionals who rank it based on freshness, color, texture, and fat content.
- Traceability: A clear record is often kept of the fish’s journey, ensuring it has been held at the proper temperature and handled correctly.
For these reasons, it is not safe to buy standard salmon from a supermarket counter (like at Whole Foods or Costco) to use for this recipe. Always purchase from a trusted local fishmonger or a reputable Japanese market that can confirm the fish is sashimi-grade.
A Chef’s Guide to Choosing Sashimi-Grade Salmon
Even when a fish is labeled “sashimi-grade,” in all my years of food styling and culinary production, I’ve learned always to do a final quality check myself. While you likely won’t be assessing a whole fish, you can still look for key indicators of exceptional quality in a fillet. When you’re at your fishmonger or market, here are the most important things to look for:
- Color: The flesh should have a vibrant, deep orange or pinkish-orange hue. Avoid any fillets that look dull, have brown spots, or show grayish tones, as these are signs of degradation and indicate the fish is past its prime and no longer safe to eat.
- Texture: When pressed, the flesh should spring back and feel firm, not mushy.
- Fat Content (Marbling): High-fat toro salmon (from the belly) is considered the most luxurious for sashimi. The higher the fat marbling, the more buttery the texture.
- Smell: Fresh, high-quality salmon should smell clean, like a fresh ocean breeze. There should be no overwhelmingly “fishy,” sour, or ammonia-like odors.
Frequently Asked Questions (FAQ)
Here are answers to common questions about making restaurant-quality salmon sashimi at home.
This label is a professional guarantee that the fish has passed stringent safety and quality assessments. The process often includes commercial flash-freezing to kill parasites, ensuring it’s safe for raw consumption. For a full breakdown, see our guide to sourcing sashimi-grade fish above.
Always purchase from a reputable source that can confirm the fish is sashimi-grade. Your best options are:
Japanese Supermarkets: Look for stores like Mitsuwa, Marukai, or H Mart.
Trusted Local Fishmongers: Specialty seafood markets in your area.
Reputable Online Suppliers: Companies like Yama Seafood, Riviera Seafood Club, or Honolulu Fish Company that ship directly to your door.
No. Never use grocery store salmon unless the package is explicitly labeled “sashimi-grade.” These fillets have not been assessed for raw consumption and are not considered safe to eat raw.
Exceptional sashimi has a rich, delicate flavor and a buttery, smooth texture that is incredibly tender. Look for vibrant orange flesh with clear lines of marbled fat. The most sought-after cut, “toro,” is from the fatty belly and is prized for being the most luxurious and flavorful.
No, a home freezer is not a safe substitute for the commercial flash-freezing process. Home freezers don’t get cold enough, fast enough, to reliably kill all potential parasites. For safety and texture, only buy fish professionally graded for raw consumption.
How to Cut Salmon Sashimi: Two Professional Methods
In my culinary training, I was taught that the way a fish is cut is considered just as important as its quality, as the slice directly impacts the final texture. The golden rule is to always slice across or against the grain (perpendicular to the muscle fibers) to ensure tender, non-stringy sashimi slices that won’t fall apart.
Here, we’ll cover the two primary professional methods: Hira-zukuri for thick, block-like slices, and Sogigiri for delicate, angled slices.
Preparation: What to Do Before You Slice
In professional kitchens, we rely on three simple prep steps for restaurant-quality results: chilling the fish, using the right knife, and handling the fish gently and cleanly.
- Chill the Fillet: Place your sashimi-grade salmon in the freezer for 15-20 minutes before you plan to slice it. This slightly firms up the flesh, making it significantly easier to achieve clean, precise cuts without damaging the delicate meat.
- Use a Long, Sharp Knife: A traditional sashimi knife (yanagiba) is ideal because its long, thin blade is designed for a single, smooth slicing stroke. If you don’t have one, use your longest and sharpest chef’s knife. Avoid serrated knives and never use a “sawing” motion, which will tear the fish.
- Work Clean & Handle Salmon Gently: Use a dry paper towel to gently pat excess moisture off the fish before slicing. Keep your cutting board clean and work efficiently to maintain the freshness of the fish.
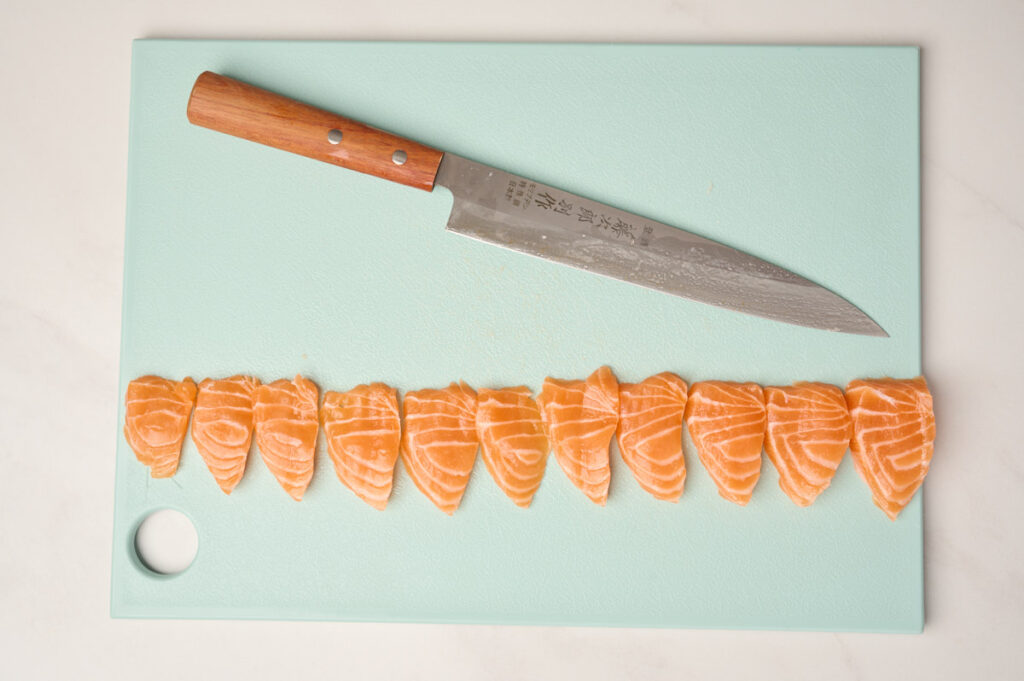
The Hira-zukuri Method (For Flat, Thick Slices)
This is the standard, all-purpose method for creating thick, rectangular sashimi slices about ¼-inch thick. It is best used on thicker, more uniform blocks of salmon loin.
- Position the Fish: Place the salmon block on your cutting board (perpendicular to your body), so you can cut across its width.
- Stabilize the Fillet: Gently place the fingertips of your non-dominant hand on the fish to hold it steady.
- Slice Downward: With the knife slightly angled in the air, insert the heel of the blade (the part closest to the handle) into the fish and pull the knife through the flesh in one smooth, fluid motion toward your body.
- Uniform Cuts: Aim for clean, consistent cuts that are roughly the same thickness.
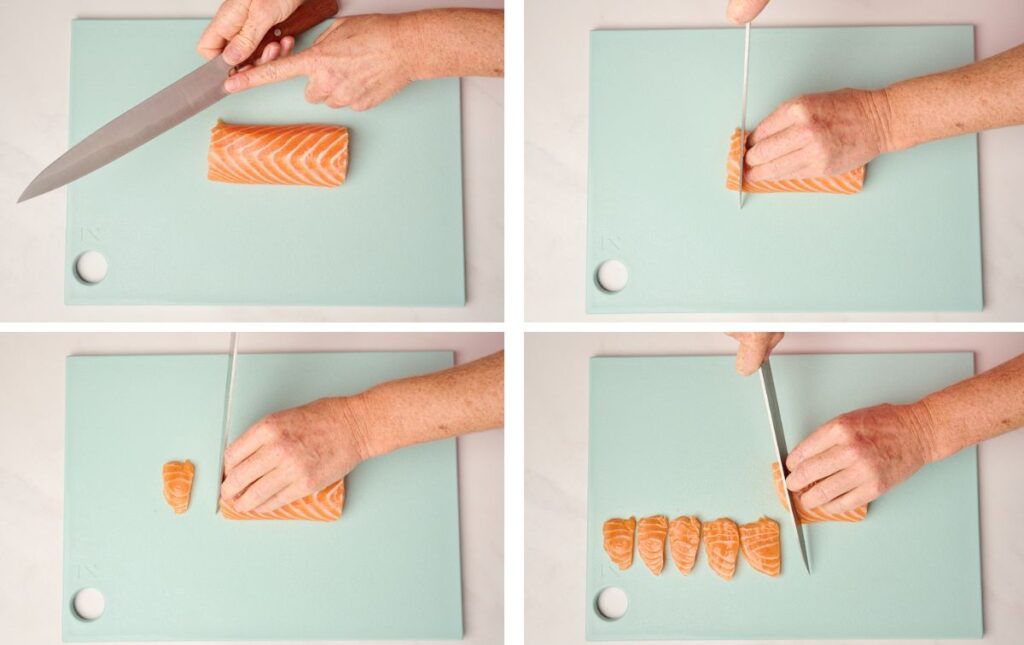
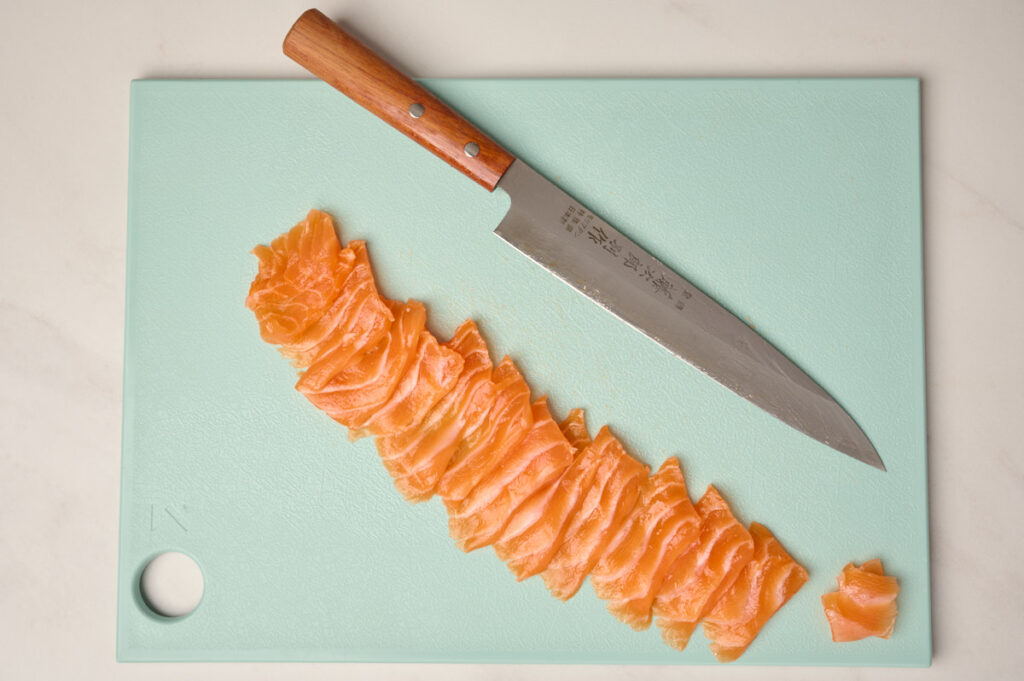
The Sogigiri Method (For Angled, Thinner Slices)
This method creates thin, delicate, angled slices and is ideal for leaner or thinner cuts of fish, like the tail section.
- Position the Fish: Place the salmon block on your cutting board, perpendicular to your body.
- Angle the Knife: Hold your knife at a low, sharp angle (around 45 degrees) to the surface of the fish.
- Slice at an Angle: Starting from one side, insert the heel of the knife into the fish, and then pull the knife through the fish to the tip in a single, smooth, and fluid motion. This angled cut creates a larger surface area, which is prized for its silky texture. Chef’s Tip: This technique takes practice. Focus on maintaining a consistent angle and using a single, graceful stroke for each slice.

Ingredient Notes
This recipe relies on a few simple, high-quality ingredients to let the salmon shine. Here are my chef’s notes on the key players.
- Jalapeño Slices: The key here is preparation. For clean heat without overwhelming spice, remove all seeds and membranes (where most of the heat-causing capsaicin is). Slice the pepper paper-thin so it almost “melts” into the salmon, providing a sharp, fresh bite.
- Yuzu Juice: This Japanese citrus has a complex, floral taste best described as a mix of lemon, lime, and grapefruit. Found bottled in most Asian markets and online, its unique tartness is the perfect counterpoint to the rich salmon. Pro Tip: If you can’t find it, you can substitute it with a 50/50 mix of fresh lemon and lime juice.
- Soy Sauce (or Tamari): I prefer low-sodium soy sauce to control the salt level, but any Japanese soy sauce will work. For a gluten-free alternative, Tamari is a fantastic choice with a similarly rich, umami flavor.
- Toasted Sesame Oil: Just a whisper of this is needed to complement the salmon’s buttery flavor with a soft, nutty depth. Always use toasted sesame oil for its richer, more complex flavor.
- Cilantro: I love adding one sprig of cilantro to each piece. It adds an herbaceous freshness and a beautiful presentation that pairs wonderfully with the jalapeño.
How to Make Salmon Sashimi?
Once your salmon is sliced correctly using one of the methods above, assembling this beautiful dish takes only a few minutes. Working quickly is key, as it ensures the delicate fish stays perfectly chilled for the best possible texture.
1. Prepare Your Components: First, thinly slicing the jalapeño and pick fresh cilantro leaves for garnish. Combine the yuzu juice and soy sauce in a small bowl; setting this aside allows the flavors to meld. Having everything ready to go is a classic chef’s technique for efficient plating called “mise en place”, a French word for having everything in its place.
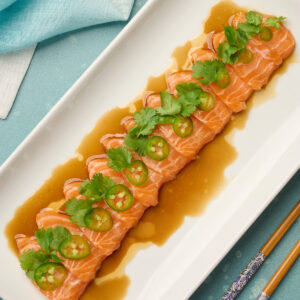
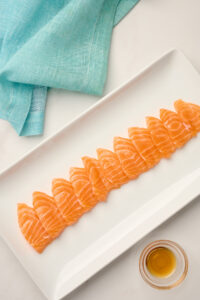
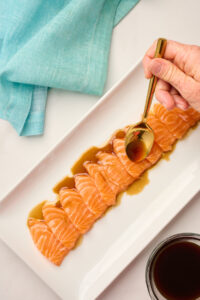
2. Arrange the Salmon: On a chilled serving plate, arrange the salmon slices so they are slightly overlapping (a technique called shingling). This pattern not only creates a stunning presentation but also makes it easy to pick up individual pieces.
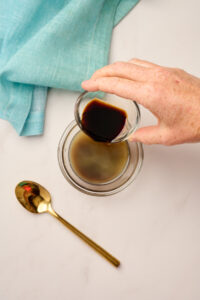
3. Dress with Sauce: Gently drizzle a few drops of toasted sesame oil over the salmon until the slices have a subtle sheen. Spoon the yuzu-soy sauce over the fish, coating each piece.

4. Garnish and Serve Immediately: Place one paper-thin slice of jalapeño and a single cilantro sprig on each piece of salmon. For the best flavor and texture, serve the sashimi the moment it’s ready. Optional: add a touch of chili oil for added depth and heat.

Salmon Sashimi with Yuzu-Soy Sauce Recipe
Ingredients
- 6-8 oz sashimi-grade salmon fillet, chilled
- ½ jalapeño, sliced into paper-thin rounds
- 1/4 cup yuzu juice
- 2 tbsp low-sodium soy sauce (or tamari for gluten-free)
- 1/2 tsp toasted sesame oil
- 1/4 cup fresh cilantro sprigs
- Optional Garnish: chili oil
Instructions
- Slice Salmon and Jalapeño: Using a very sharp knife, slice the chilled salmon fillet against the grain into approximately ¼-inch thick pieces and thinly slice the jalapeño.

- Arrange on Plate: Layer the salmon pieces on a chilled serving plate.

- Mix Sauce: In a small bowl, combine the yuzu juice and soy sauce.
- Dress: Drizzle the sesame oil over the layered salmon, then spoon the sauce over the top to coat each piece.
- Garnish & Serve: Top each piece of salmon with one jalapeño slice and a cilantro sprig. Serve immediately, adding a drizzle of chili oil if desired.


Notes
- Fish Safety: It is only safe to use salmon explicitly labeled “sashimi-grade.” This should be purchased from a reputable Japanese market or a trusted fishmonger, not a standard supermarket counter.
- Preparation Tip: For easier, cleaner slicing, place the salmon fillet in the freezer for 15-20 minutes before cutting.
- Slicing Technique: Always slice against the grain for the most tender texture. You can use the Hira-zukuri method (slicing straight down for thick, rectangular pieces) or the Sogigiri method (slicing at an angle for thinner, delicate pieces). For a complete visual guide, refer to the post above.
- Yuzu Substitute: If you cannot find yuzu juice, you can substitute a 50/50 mix of fresh lemon and lime juice with a splash of grapefruit juice.
- Storage: Sashimi is best enjoyed immediately. Storing leftovers is not recommended for safety or quality.
Nutrition
Recipe Variations
As a chef, I love this recipe’s simplicity, but it’s also a fantastic base for customization. Here are a few of my favorite variations:
- Spicy Togarashi & Yuzu Kosho: For a complex, spicy kick, add a pinch of yuzu kosho (a Japanese citrus-chili paste) to your yuzu-soy sauce. Garnish the finished dish with a dusting of
Shichimi togarashi (a Japanese seven-spice blend).
- Creamy Avocado & Miso: For a richer, creamier version, whisk a teaspoon of white miso paste into the sauce until smooth. Serve the dressed salmon alongside thinly sliced avocado.
- Crunchy Garlic & Shallot: For incredible texture, top the finished sashimi with a generous sprinkle of toasted sesame seeds, crispy fried garlic, and crispy fried shallots just before serving.
What to Serve with Salmon Sashimi
When I’m culinary producing for a shoot or planning a dinner party, this sashimi is a perfect light appetizer. Here are a few ideas for building a complete menu around it:
Salads & Appetizers: To start the meal with a refreshing crunch, this simple Japanese Cucumber Salad is a classic choice that takes only minutes to prepare. For something a little heartier, this Miso Shaved Brussels Sprouts Salad offers a savory, slaw-like texture that also pairs wonderfully with the delicate fish.
Vegetable Sides: When it comes to warm vegetable sides, you can’t go wrong with this addictively delicious Miso Eggplant. If you prefer a simple green, this easy Baby Bok Choy recipe is quick to make and won’t overpower the main dish.
Rice & Noodles: To turn this appetizer into a more substantial meal, serve it alongside a carbohydrate like simple Steamed Rice, which is perfect for soaking up the extra yuzu-soy sauce. You can also pair it with this savory Egg Fried Rice for a more filling option.
Additional Main Courses: If you’re creating a multi-course feast, this sashimi makes a fantastic starter. Follow it up with a classic main dish like my easy Teriyaki Chicken, which you can make on the grill or stovetop. For another great option, this one-pot Galbi Jjim (Korean Braised Short Ribs) makes for a show-stopping main course that will impress any guest.
Storage and Make-Ahead Guide
In all my years in professional kitchens, food safety has been the number one priority. For the best and safest experience, sashimi should be eaten fresh, but here are the specific guidelines for storage:
Storing Leftovers (Not Recommended): This dish is meant to be enjoyed immediately, and storing leftovers is not recommended for food safety guidelines.
Storing an Uncut Fillet (Make-Ahead): If you purchase your raw salmon and plan to make the sashimi the following day, cover the fish with paper towels and keep it in an airtight container. You want to avoid any moisture or air contributing to spoilage. I would keep it in the refrigerator for a maximum of 2 days at a temperature of 30-36 degrees Fahrenheit.
Freezing Leftover Slices (For Cooked Use Only): You can freeze leftover, undressed salmon slices for up to two weeks, but do not eat them raw after thawing. Instead, use the thawed salmon for searing or any other cooked dish. The process in which purveyors freeze raw fish safely goes beyond the capabilities of a home freezer.


This was to die for! So simple and delish…Will definitely be making again!
Leave a comment