Whether you’re batch cooking for the week or prepping a cozy dinner, this shredded chicken recipe and five easy shredding methods bring chef-level flavor with everyday ease.
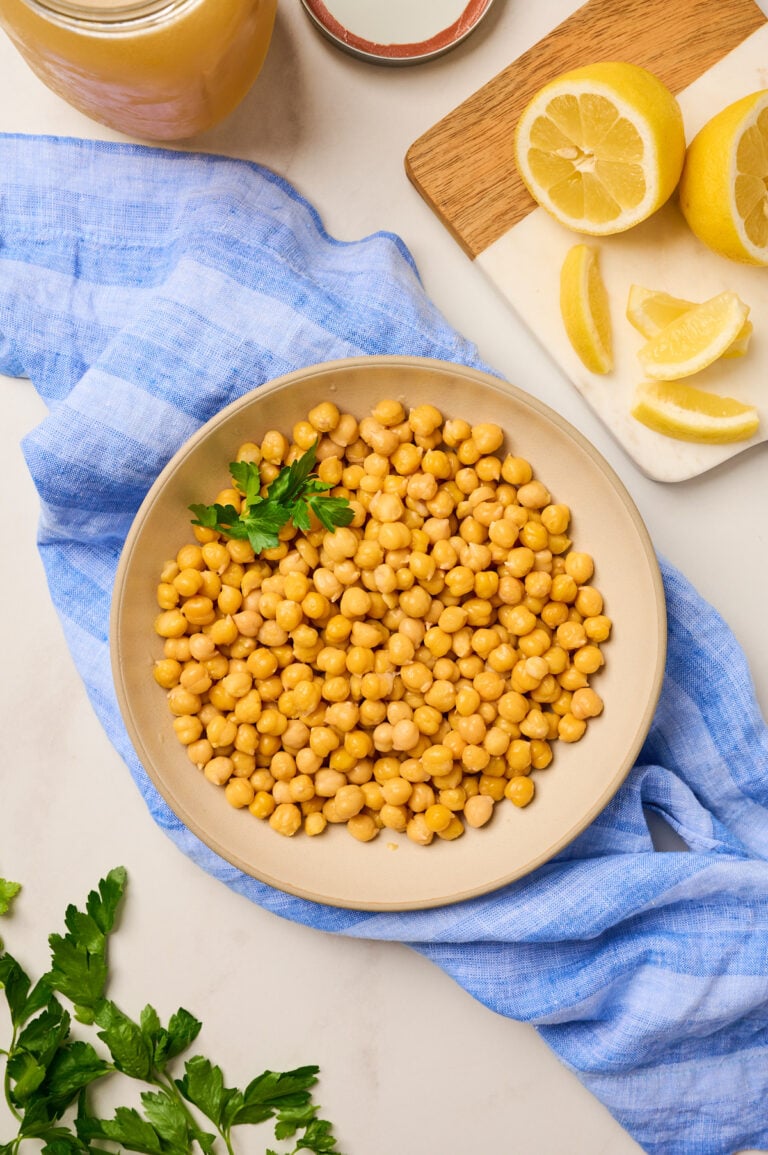
This recipe comes together with a whole chicken or boneless, skinless breasts or thighs, plus classic aromatics like carrots, celery, onions, garlic, and lemon peel. Everything simmers gently with herbs and kosher salt in cold water, creating a rich, clean broth that can be repurposed throughout the week for soups, grain bowls, and more. The shredded chicken, also known as pulled chicken, is perfect for quick salads, sandwiches, pasta, wraps, tacos, and hearty bowls.
Unlike other recipes, this comprehensive guide walks you through four different cooking methods—stovetop, oven, Instant Pot, and slow cooker—and five ways to shred chicken, from classic forks to stand mixers. Whether you’re using a whole chicken for homemade broth or boneless cuts for speed, you’ll get juicy, flavorful results with zero waste.
What sets this recipe apart is the value you get from a single pot. As a chef, I use this technique to create not just tender, shredded chicken but also a golden, aromatic broth that can stretch across your meals for the week. Whether you have time for a whole chicken or need a faster, boneless method, both options provide flavor-forward results without waste.
If you’re new to poaching, you can also check out my Poached Chicken Guide to see how I layer aromatics for consistent, tender results.
Looking for something specific? Choose your path:
Chef Techniques & Foundational Tips
- Choosing Your Chicken: Whole vs. Boneless Cuts
- Building Flavor: Key Ingredients & Aromatics
- Chef’s Secrets: Pro Tips for Moist, Flavorful Shredded Chicken
How to Cook Shredded Chicken (By Method)
Recipe & Beyond
- Step-by-Step: How to Make Shredded Chicken
- Effortless Shredding: 5 Methods Compared
- Jump to the Full Recipe Card
- Storage & Reheating
- Creative Uses for Shredded Chicken
- Your Questions Answered (FAQs)
Choosing Your Chicken: Whole vs. Boneless Cuts
This recipe works beautifully with either a whole chicken or boneless, skinless breasts or thighs; each offers its advantages depending on your needs.
The Chef’s Pick: Whole Chicken for Rich Broth
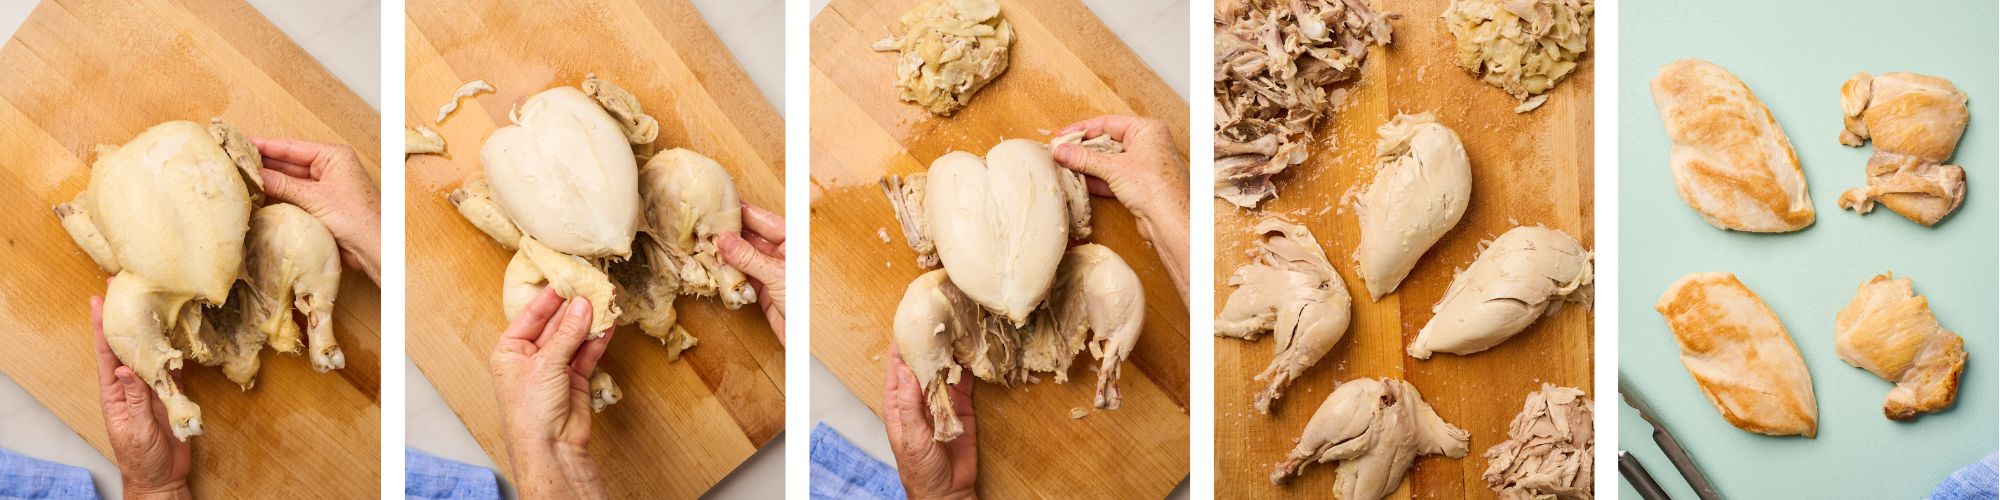
As a chef, I always reach for a whole chicken. Yes, you’ll need to remove the skin and bones, but the succulent, tender meat and deeply flavorful broth make it more than worth the effort. The payoff is unbeatable: juicy white and dark meat, a pot of golden, aromatic broth, and nothing wasted.
You also get hidden gems—like what chefs call the “oyster,” a small, rich piece of dark meat near the thigh, and other flavorful bits tucked around the backbone that are often missing from pre-cut chicken.
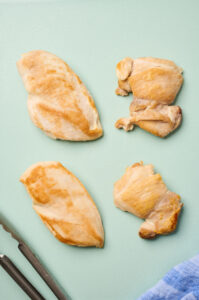
This method yields incredibly tender meat that practically falls apart with your fingers—no equipment required. And when removing the skin and bones, don’t toss the skin. Save it in a container in your freezer. Rendered chicken skin makes an unbelievably flavorful fat for sautéing, roasting vegetables, or starting soups.
Chef’s Preferred Method: While all cuts of chicken and cooking methods are viable, using a whole chicken and the stovetop method is my favorite for yielding the juiciest, most flavorful chicken and broth, with the most straightforward process and equipment. The stovetop method allows you to skim the surface periodically for impurities, maintain direct control over the heat, and check the chicken for doneness.
Faster Option: Boneless Cuts for Quick Prep
If you’re short on time, boneless, skinless chicken breasts or thighs are a great option. They cook quickly and shred easily, making them ideal for weeknight meals or meal prep. For even more flavor, give them a quick sear before poaching.
Optional Step: Searing for Enhanced Flavor
Want a savory, golden crust? Sear your boneless chicken for 2–3 minutes per side before poaching. The Maillard reaction adds richness and complexity with minimal effort. This reaction occurs when proteins and sugars react to high heat, creating a rich browning effect that results in a supremely flavorful golden crust.
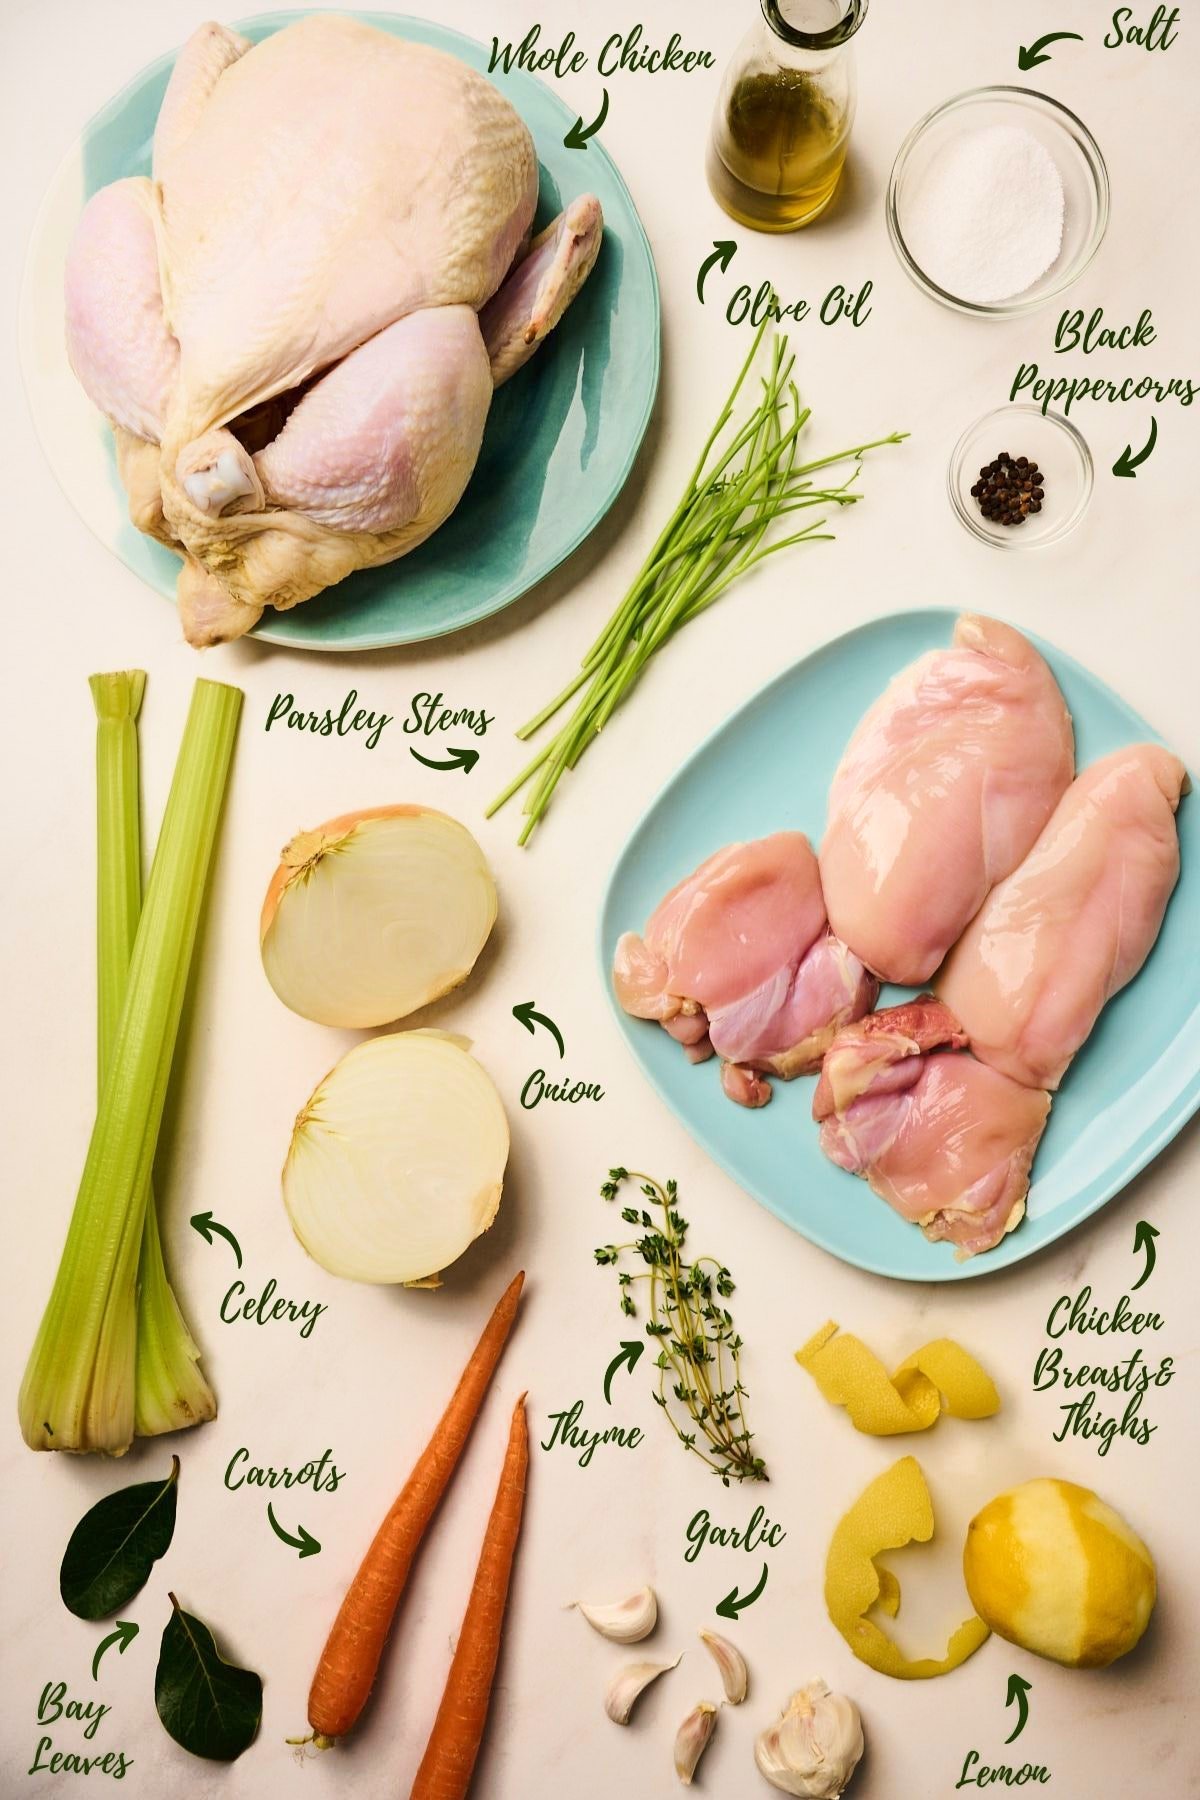
Building Flavor: Key Ingredients & Aromatics
A few core ingredients lay the foundation for rich, layered flavor, starting with the chicken and then building with vegetables, herbs, and seasoning. Whether you’re using a whole bird or boneless cuts, these elements infuse both the meat and broth with depth and balance.
The pronounced flavor comes from this thoughtful layering: tender chicken, sweet vegetables, fresh aromatics, and just the right amount of salt. Each component contributes to creating a clean, complex broth and juicy, well-seasoned meat.
Protein Options: What to Expect
Whole Chicken: A whole bird brings big flavor and full-body richness. The bones and skin release collagen and fat during cooking, which enriches both the meat and broth. The skin, bones, and connective tissue also help keep the meat moist and tender during the cooking process. You’ll get the full spectrum of white and dark meat, plus a pot of incredibly flavorful broth to use in other recipes.
Boneless Breasts or Thighs: These cuts cook quickly and offer convenience, especially when seared for extra depth. They produce clean, uniform shreds—ideal for salads, wraps, or grain bowls. Because they’re leaner, it’s essential to let them rest after cooking and store them with a splash of broth to retain moisture.
Crafting the Broth: Mirepoix, Herbs & More
Mirepoix + Add-Ins (Carrots, Celery, Onion, Garlic, Lemon Peel): This classic French base gives the broth its backbone. Garlic adds a bit of edge, while lemon peel adds brightness. Want to make it your own? Try layering in shallots, citrus zest, or a dried chili for complexity.
Bouquet Garni (Bay Leaf, Thyme, Parsley Stems, Peppercorns): This traditional herb bundle adds an earthy, nuanced flavor that complements the broth without overpowering it. Use parsley stems—not the leaves—as they hold up better during poaching and won’t turn bitter. Just one fresh bay leaf is enough—its flavor is stronger than that of dried bay leaves.
Seasoning for Success
Kosher Salt: Don’t under-season. A rule I learned early on in restaurant kitchens is to use 1 tablespoon of kosher salt for every 4 cups of water. The salt infuses the chicken and broth with a balanced flavor. No bland chicken or broth!
Water (or Liquid Enhancers): Water keeps the flavor clean, allowing the aromatics to shine. However, if you plan to use the broth for something heartier, consider adding a splash of chicken stock, dry white wine, or even a swirl of cream to enrich the base.
Chef’s Secrets: Pro Tips for Moist, Flavorful Shredded Chicken
These quick tips will help you get the best results from the start—whether you’re cooking a whole bird or boneless cuts.
- Always Start With Cold Water: In my culinary production work, we always start with cold water when poaching. Gradual heat helps the chicken cook evenly from the inside out, preventing the outer layer from tightening too quickly. Gradual heat ultimately preserves texture and locks in moisture.
- Season the Water Generously: Aromatic vegetables, herbs, and a good amount of salt are key. Use about 1 tablespoon of kosher salt per 4 cups of water. Stick with unsalted liquid so you can control seasoning and let the aromatics shine.
- Use a Thermometer For Precision: Poached chicken can easily go from juicy to dry. Remove it from the heat when the internal temperature reaches 156°F — it’ll continue to rise to 165°F while resting. A quick-read thermometer takes out the guesswork.
- Let It Rest Before Shredding: Resting locks in juices to keep the meat moist. If you skip this step, your cutting board will be left with all the flavor you worked so hard for. Here’s a quick guide:
- Whole Chicken: 10–15 minutes
- Breasts or Thighs: 5–7 minutes
- Use the Broth to Keep Chicken Moist: That leftover poaching liquid is packed with flavor. Stir in 2–4 tablespoons before storing to keep the chicken juicy and tender.
- Chef’s Tip: Keep an extra jar of broth in the fridge. Add a spoonful to revive leftovers throughout the week; it’s a game-changer.
Step-by-Step: How to Make Shredded Chicken (Your Chosen Method)
This visual walkthrough shows you how to poach and shred chicken like a pro, whether you’re working with a whole bird or boneless cuts. Use the cues and tips below to get juicy, flavorful results every time, plus a bonus pot of golden broth to use throughout the week.
Checkout the various cooking methods below.
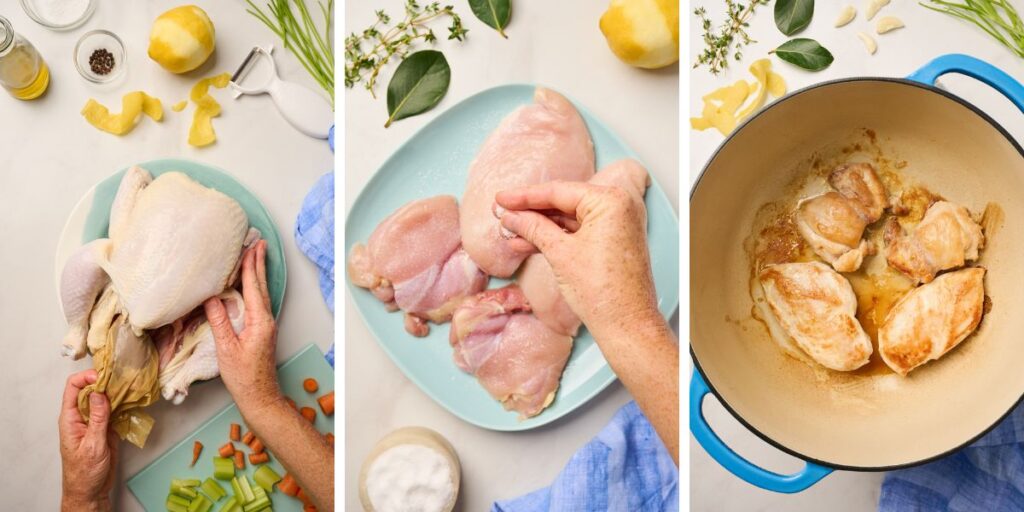
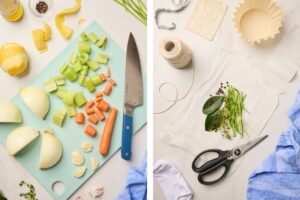
Preparing Your Ingredients & Aromatics
Start by chopping carrots, celery, and onion, and smashing a few garlic cloves. Use a vegetable peeler to remove strips of lemon peel, avoiding the white pith, which can become bitter. These aromatics don’t just flavor the chicken—they build the foundation of a rich, clean broth that you can use for other recipes.
Chef’s Tip: If your lemon peel is exceptionally thick, trim away the pith to keep your broth from turning bitter.
Then, prep your herb bundle. Place the thyme, bay leaf, parsley stems, and black peppercorns in a square piece of cheesecloth or spice bag and secure with butcher’s twine.
Why an Herb Bundle? This method infuses the broth gently without loose bits floating around. It’s also easy to remove once the chicken is done—no straining required.

Poaching Your Chicken: Fundamental Principles
Before diving into the specific cooking methods, mastering a few core principles will ensure your shredded chicken is consistently moist, flavorful, and yields a rich, golden broth every time.
Before You Cook: Prep Your Cooking Vessel
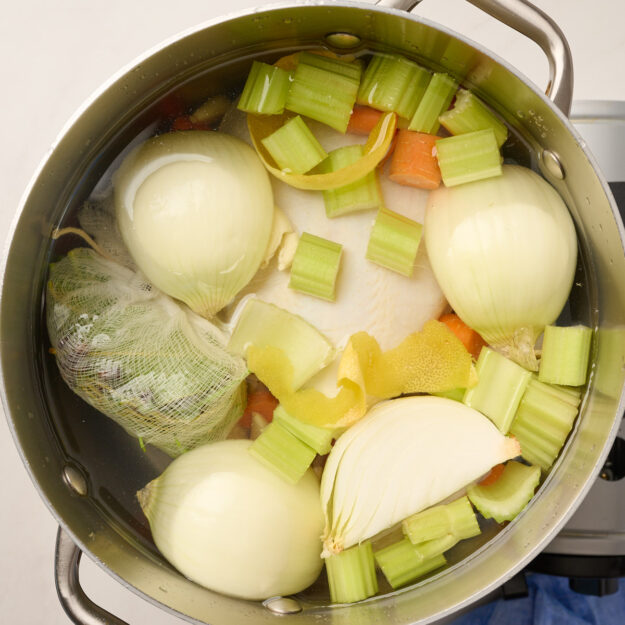
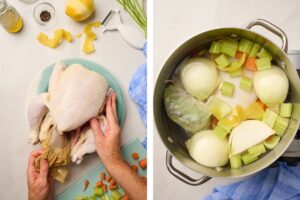
- Whole Chicken: Check the cavity and remove the giblet packet. Place the bird in a large pot, Dutch oven, Instant Pot insert, or slow cooker with your aromatics and herb bundle.
- Boneless, Skinless Breasts or Thighs:
- Searing is optional but recommended. Brown in neutral oil for 2–3 minutes per side to develop a savory, golden crust and deepen the final flavor.
- Sensory Cue: Flip when the chicken naturally releases. If it sticks, it needs more time.
- Add seared or raw chicken to large pot, Instant Pot insert, or slow cooker with your aromatics and herb bundle.
- Important Note: Start with Cold Water
Cover chicken and aromatics with cold water by 1 inch.- Why? Cold water promotes gradual heat and even cooking, allowing connective tissue to break down gently. You’ll get tender meat and a clear, well-balanced broth.
- Chef’s Cue: How to Know When Chicken is Done
- Whole Chicken: Drumsticks wiggle, juices run clear (no red or pink), and meat pulls away cleanly from the bone with no resistance.
- Boneless Cuts: Fully opaque and easily pulls a part with a fork.
Cooking Your Chicken: Method-Specific Guides
Now that you understand the foundational steps, let’s explore the precise timing and techniques for each cooking method, ensuring perfect results whether you prefer the stovetop, oven, Instant Pot, or slow cooker.
Stovetop
(First time making this recipe? Be sure to review the Ingredient Prep and Fundamental Principles sections above before you begin.)
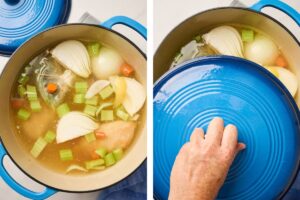
- Whole Chicken: Bring the mixture to a boil first, then reduce to a gentle simmer and cook uncovered for 25–30 minutes. Skim foam as it rises.
- Boneless Cuts: Bring to a boil, turn off the heat, cover, and let sit for 10–15 minutes.
Why it works? Most control and flexibility. Easy to skim, monitor doneness, and adjust heat.
Troubleshooting: Avoid a rolling boil—it toughens the meat and clouds the broth. As soon as it boils, reduce to a simmer.
Oven
(First time making this recipe? Be sure to review the Ingredient Prep and Fundamental Principles sections above before you begin.)
- Whole Chicken: 375°F, covered, 25–30 min.
- Boneless Cuts: 375°F, covered, 10–15 min.
Why it works? Provides gentle, even heat—great if your stovetop runs hot or you want to multitask.
Troubleshooting: Keep tightly covered. Add a splash of water if broth reduces too much.
Instant Pot
(First time making this recipe? Be sure to review the Ingredient Prep and Fundamental Principles sections above before you begin.)
- Whole Chicken: 15 min high pressure + 10 min natural release.
- Boneless Cuts: 9 min high pressure + quick release.
Why it works? Fastest method with rich, concentrated flavor. Pressure locks in moisture.
Troubleshooting: Ensure the valve is turned from venting to sealing and properly locked in place with the lid. Forgetting to do this could cause the liquid to evaporate, and the chicken can burn.
Slow Cooker
(First time making this recipe? Be sure to review the Ingredient Prep and Fundamental Principles sections above before you begin.)
- Whole Chicken: 6–7 hrs Low or 3–4 hrs High.
- Boneless Cuts: 2.5–3.5 hrs Low or 1.5–2.5 hrs High.
Why it works? Set it and forget it. Slow, steady cooking yields tender meat and flavorful broth.
Troubleshooting: Don’t overfill—water should be 1 inch above ingredients to avoid diluted broth.
Rest the Chicken & Strain the Broth
The cooking process doesn’t end when the heat is off; these crucial post-cooking steps are key to achieving perfectly juicy shredded chicken and a rich, versatile broth.
- Transfer the chicken to a cutting board.
- Whole Chicken: Rest for 10–15 minutes before removing the skin and bones.
- Boneless Cuts: Rest for 5–7 minutes.
- Whole Chicken: Rest for 10–15 minutes before removing the skin and bones.
- Why rest? It locks the juices into the meat, rather than all over your cutting board, so you can savor each juicy and moist bite.
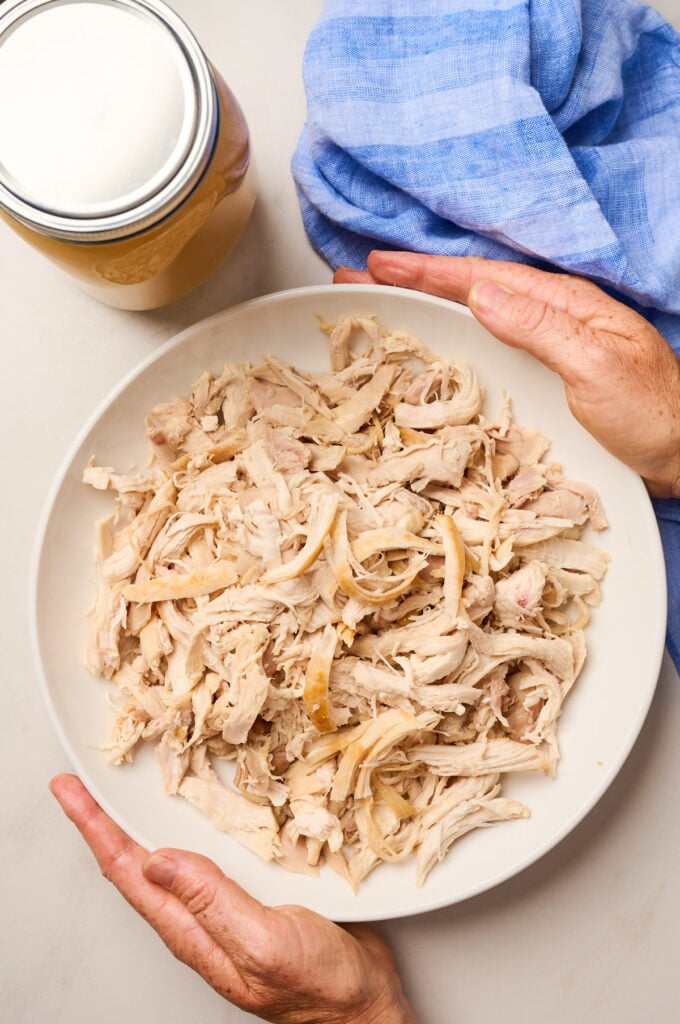
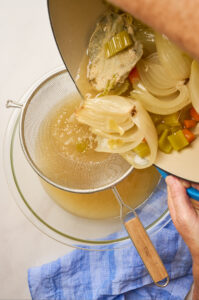
- Strain out the vegetables and herbs and save your broth—don’t toss it! It’s liquid gold for reheating soups, cooking grains, or building sauces. Shred the chicken while it’s still warm for the most tender texture.
- Chef’s Tip: Warm chicken shreds more easily and stays juicier. Cold meat can become stringy and harder to pull apart cleanly.
Now that you have perfectly cooked chicken, you’re ready to shred it like a pro!

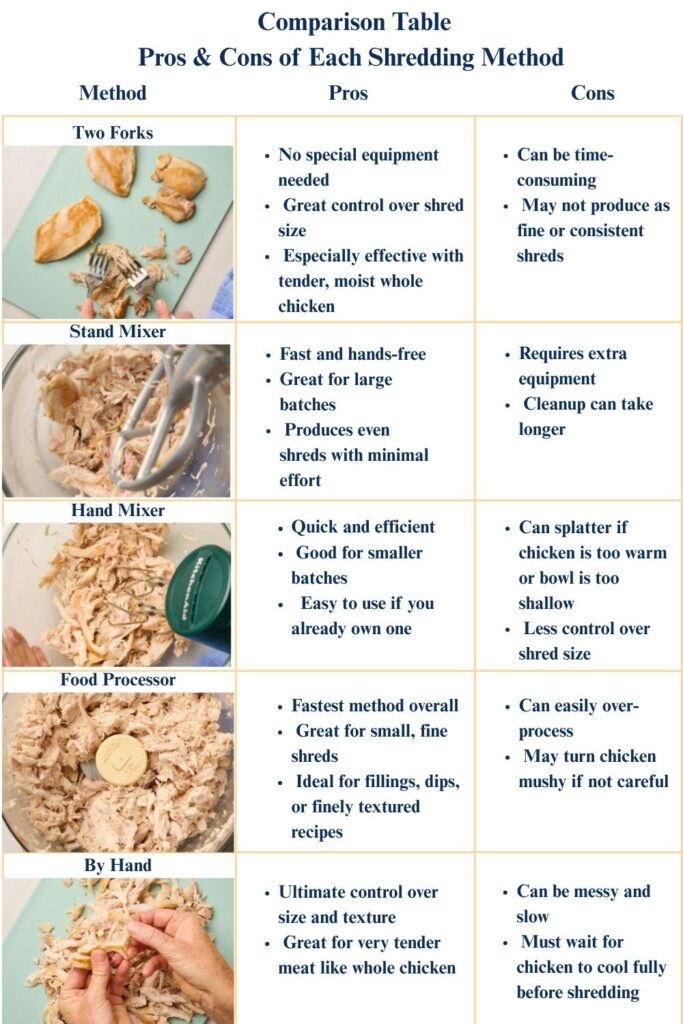
Effortless Shredding: 5 Methods Compared
Once your chicken is fully cooked and rested, it’s time to shred. Start while the meat is still warm; this helps the protein fibers come apart easily and keeps the texture tender and juicy.
Here are five methods to choose from, depending on your tools and how you plan to use the chicken:
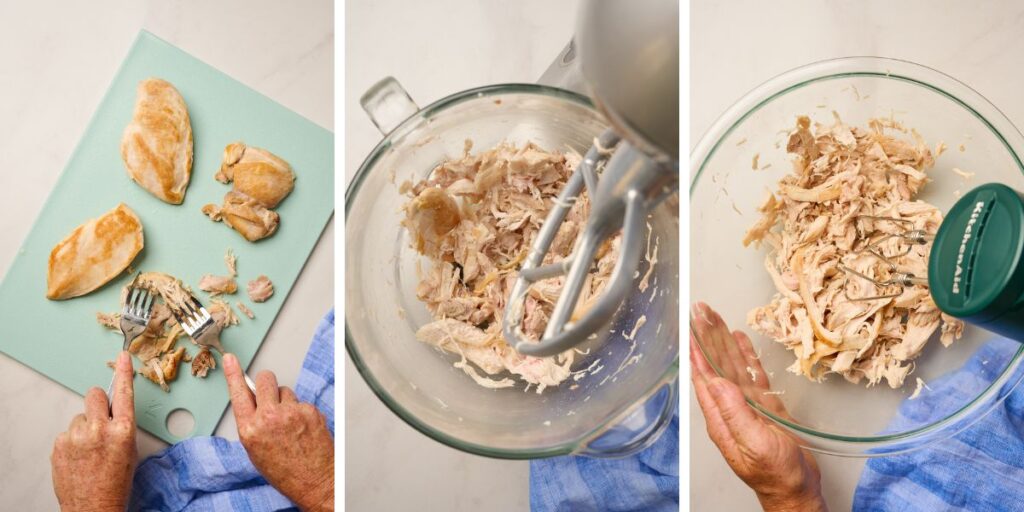
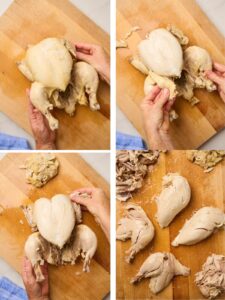
1. Two Forks (Best for Whole Chicken): Place the chicken on a cutting board and use two forks to pull it apart with the grain. The forks give complete control over shred size and are especially effective with whole chicken, as it’s more tender and moist due to the bones and skin.
2. Stand Mixer (The Pro’s Time-Saving Hack): For large batches, nothing beats a stand mixer fitted with the paddle attachment. Mix on low for 20–30 seconds. This method is efficient, especially for large batches, and works best for firmer, boneless breasts and thighs.
3. Hand Mixer (Fast with a Small Cleanup Hack): Place the chicken in a deep bowl and mix on low speed, covering it with a loose towel or plastic wrap to prevent the chicken from flying out. It’s quick and yields uniform pieces.
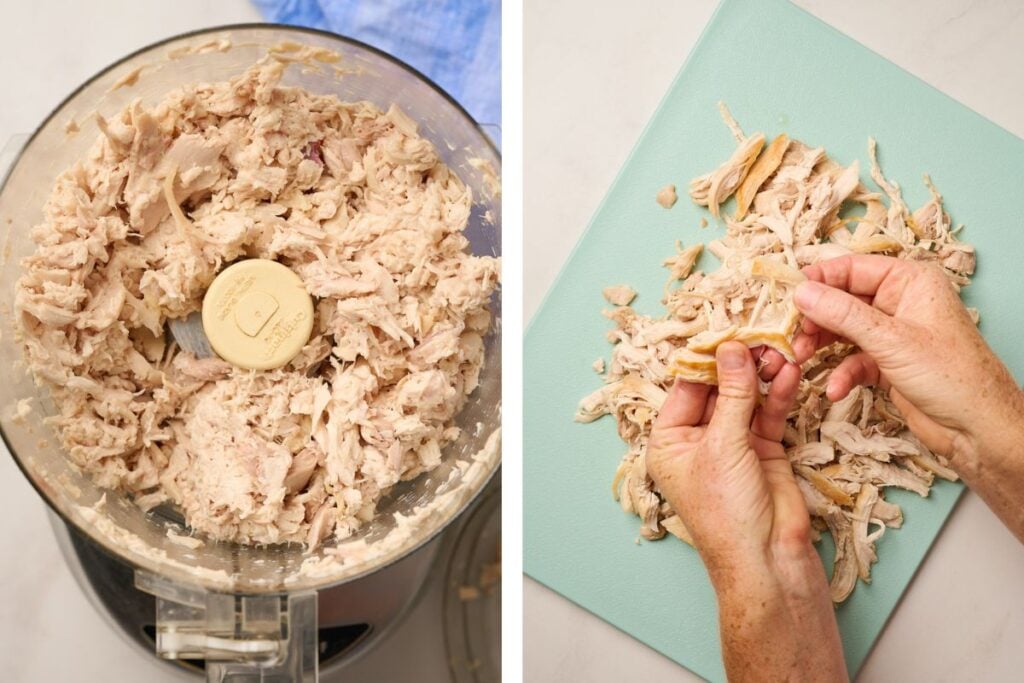
4. Food Processor (Best for Chicken Salad or Enchiladas): Pulse 1–2 times. It shreds quickly but can easily over-process. This method is ideal when you want smaller, chunkier pieces, such as for stuffing, chicken enchiladas, or sandwich fillings.
5. By Hand (Rustic and Simple): Once the chicken is cool enough to touch, pull it apart using your fingers. By hand is an excellent method for whole chickens, where the meat is extra tender. For boneless cuts, however, it can be trickier and more time-consuming, so forks or mixers are better.

Shredded Chicken Recipe (Whole Chicken or Boneless Cuts)
Equipment
Ingredients
- 1 whole chicken (about 3½–4 lbs) or 1½–2 lbs boneless, skinless chicken breasts or thighs
- 2 carrots, chopped
- 2 celery stalks, chopped
- 1 yellow or white onion, quartered
- 4 garlic cloves, smashed
- peel of 1 lemon
- 1-2 bay leaves (use only 1 if fresh)
- 6-8 parsley stems
- 5-6 sprigs fresh thyme
- 1/2 tsp whole black peppercorns
- 2 tbsp kosher salt
- Water (enough to cover the chicken by 1 inch)
- Neutral oil (for optional searing, boneless method only)
Instructions
Prep the Ingredients
- Chop carrots, celery, and onion. Smash garlic and peel lemon. Wrap bay leaves, parsley, thyme, and peppercorns in cheesecloth or a spice bag.
Whole Chicken (Best Flavor + Broth)
- Remove the giblet cavity, and place the whole chicken in a large pot, Dutch oven, Instant Pot, or Slow Cooker. Add aromatics, herb bundle, salt, and enough cold water to cover the chicken by 1 inch. Important: Start with cold water for even, gradual cooking and rich broth.
- Choose a method:• Stovetop: Bring to boil, then reduce to low simmer (uncovered), and cook for 25–30 minutes. • Oven: Cover and bake at 375°F for 25–30 minutes. • Instant Pot: Set to Manual | High Pressure for 15 minutes. Natural release for 10 min.• Slow Cooker: Cook on Low for 6–7 hours or High for 3–4 hours.
- Skim off any foam during cooking. Once cooked, transfer the chicken to a cutting board and let it rest for 10–15 minutes to keep it juicy. While warm, remove skin and bones.
- Strain the broth and save it separately.
- Shred while warm for best texture: this helps the protein fibers come apart easily and stay juicy. Shredding Methods:• Two forks (classic, no tools needed)• Stand mixer (fast, hands-free)• Hand mixer (quick for small batches)• Food processor (great for dips or fillings)• By hand (best for larger pieces)

Boneless Breasts or Thighs (Faster Option)
- Optional: Sear the chicken in a bit of neutral oil for 2–3 minutes per side until golden brown. This step deepens flavor through the Maillard reaction but is not required.

- Place chicken in a large pot, Dutch oven, Instant Pot, or Slow Cooker with aromatics, herb bundle, salt, and enough cold water to cover by 1 inch.Important: Start with cold water for gradual heat to get juicy, moist chicken.
- Choose a cooking method: • Stovetop: Simmer uncovered 10–15 minutes. • Oven: Cover and bake at 375°F for 10–15 minutes. • Instant Pot: Manual | High Pressure for 9 minutes. Quick release.• Slow Cooker: Cook on Low for 2.5–3.5 hours or High for 1.5–2.5 hours.
- Skim foam if needed. Once cooked, transfer chicken to a cutting board and let it rest for 5–10 minutes.
- Strain and save the broth. Shred chicken while warm using your preferred method.
Notes
- Use cold water: Starting with cold water allows for gradual cooking and better flavor absorption.
- Save the broth: Leftover cooking liquid becomes a rich, homemade broth—perfect for soups, sauces, or rehydrating leftovers.
- Storage: Store shredded chicken in an airtight container with a few spoonfuls of broth to keep it moist. Refrigerate for 5–6 days or freeze (without broth) for up to 2 months.
- Serving Ideas: Use in salads, bowls, pasta, tacos, soups, enchiladas, or sandwiches.
Nutrition
Chef-Approved Flavor Variations
While the classic recipe is wonderfully versatile, you can infuse the poaching liquid with different aromatics to create a new flavor profile from the start. Try one of these global twists:
- Asian-Inspired: Add a few slices of fresh ginger, 2-3 smashed scallions, and a splash of Chinese cooking wine to the water.
- Mexican-Inspired: Add the peel of 1 lime, a handful of cilantro stems, and 1-2 dried Ancho or Guajillo chilies to the water.
- Mediterranean-Inspired: Add several large strips of lemon peel, a few extra smashed garlic cloves, and a teaspoon of whole oregano to the water.
Storage & Reheating: Keep Your Shredded Chicken Fresh
Shredded chicken is a meal prep MVP. Store it properly and reheat it correctly to keep it moist, tender, and flavorful throughout the week.
Refrigerator: Store in an airtight container for 5–6 days. Add a few spoonfuls of reserved broth before sealing to keep the meat juicy.
Freezer: Freeze in a sealed freezer-safe bag or container for up to 2 months. Include a bit of broth to prevent dryness. Thaw overnight in the fridge before reheating.
Stovetop (Best Overall): Add chicken and a splash of broth or water to a small skillet. Cover and warm over medium-low heat for 3–5 minutes, stirring occasionally.
Microwave (Fastest): Place in a microwave-safe dish with a spoonful of liquid. Cover with a damp paper towel or lid, and heat in 30-second intervals, stirring between each interval.
Oven (For Larger Batches): Preheat to 325°F. Place chicken in a covered baking dish with a few tablespoons of broth or water. Heat for 10–15 minutes until warmed through.
Chef’s Tip: Always reheat gently, adding moisture as needed. It revives the texture and brings your chicken back to life as if someone had just cooked it.
Creative Uses for Your Shredded Chicken
Once you have a batch of juicy, shredded chicken ready, it becomes the ultimate add-on for quick lunches, weeknight dinners, or meal prep bowls. Here are some of my favorite ways to use it:
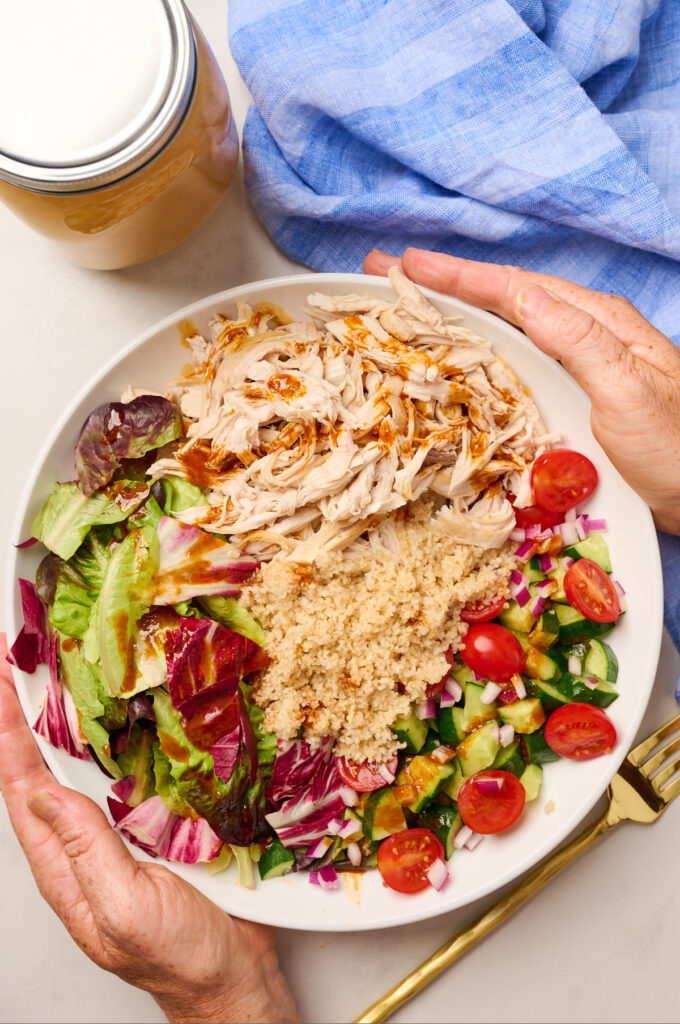
Toss with a Sauce: Add flavor fast by mixing shredded chicken with tahini sauce for creaminess, harissa paste for heat, or a vibrant basil vinaigrette for a fresh, herbaceous twist.
Salads: Toss it into a hearty salad, such as this fresh tabbouleh salad, persimmon salad, or burrata salad, for an easy protein boost.
Sandwiches & Wraps: Mix with pistachio pesto or tzatziki for a flavorful chicken salad. Serve on sourdough, stuff into a pita, or roll into a wrap.
Soups: Stir into Chicken Tortilla Soup or Coconut-Ginger Kabocha Squash Soup to add richness and body.
Grain Bowls & Bakes: Top cooked bulgur wheat, farro, or rice with shredded chicken and veggies for a balanced meal. It’s also perfect for green chicken enchiladas.
Veggies & Sauces: Pair it with roasted vegetables or sautéed kale and drizzle with your favorite sauce; avocado dressing or dill sauce for an extra flavor boost.
FAQs
Yes, they are the same. “Pulled” is common for BBQ, while “shredded” is used for everyday dishes like tacos and soups.
A 3½–4 lb whole chicken typically yields 4 to 5 cups of shredded chicken, depending on the exact size and cooking method.
Yes, but you must increase the cooking time. For an Instant Pot, add 2–3 minutes of pressure. For oven or stovetop, increase the time by about 50%. Always use a thermometer to ensure the chicken reaches 165°F.
Safety Tip: Never cook a whole frozen chicken outside of a pressure cooker, as it won’t cook safely or evenly.
Searing boneless cuts builds a deep, savory flavor, but it isn’t required. If you skip this step, the chicken will be tender but milder. You can easily compensate by adding more aromatics to your poaching liquid.
It depends on your preference. Hand shredding gives you more control over the texture, while a stand or hand mixer is faster for large batches.
You can infuse the poaching liquid with aromatics (like ginger for an Asian twist or chilies for Mexican). Alternatively, toss the warm, shredded chicken with your favorite spices, sauces, or a vibrant vinaigrette.
This usually means the chicken was overcooked. Use a thermometer to ensure the meat doesn’t go much past 165°F. To fix existing dryness, toss the shredded chicken with a few tablespoons of warm broth and let it rest, covered, for a few minutes to rehydrate.
More Chef-Tested Chicken Recipes You’ll Love
Looking for other bold, chef-tested chicken recipes? Here are a few of my go-tos that showcase chicken in different (and delicious) ways:
- Warm up with a bowl of Chicken Tortilla Soup — a smoky, brothy classic with tender chicken, corn, and a touch of heat.
- These Green Chicken Enchiladas are rolled in a zesty, homemade verde sauce and baked until bubbly, making them a comforting weeknight dinner.
- Try a twist on Japanese comfort food with this crispy Chicken Katsu Curry — a golden-fried cutlet served with a rich, savory curry sauce.
- Want to break down a bird yourself? My guide on How to Debone a Chicken walks you through the process with chef-tested steps and tips.
- For something sweet and savory, yet crowd-pleasing, my Teriyaki Chicken Recipe features juicy chicken glazed in a sticky soy-ginger sauce.
- Looking for a showstopper? This elegant Chicken Ballotine is stuffed, rolled, and roasted to create a dish that feels restaurant-worthy yet is simple to prepare at home.